
If your Morris County home was built before 1978, painting it is partly a paint job and partly a repair and safety job. Old houses often hide lead paint, moisture damage, cracked plaster, and rotten wood. If those problems are skipped, new paint can fail fast.
Here’s the short version:
- Lead safety comes first on many older homes, because paid work on pre-1978 painted surfaces often falls under EPA lead-safe rules.
- Repairs come before primer, especially for soft trim, failed caulk, loose plaster, and water entry points.
- Older materials need the right coating, because wood, plaster, and masonry can trap moisture if the wrong paint is used.
- Color and sheen matter, since historic homes usually look better with softer tones and lower-shine finishes.
- Some homes face local review rules, so outside changes may need approval before work starts.
- A specialist makes sense when the job includes lead-safe prep, high areas, detailed trim, or damaged old surfaces.
A few facts stand out. The EPA’s lead rule centers on pre-1978 homes. And in Morris County, freeze-thaw weather, summer humidity, rain, and snow put extra stress on old exterior paint systems.
So if I were planning this kind of project, I’d keep the focus on five things: test or assume lead, stop moisture, repair first, use breathable products where needed, and check local review rules before changing visible exterior surfaces.
That’s the core of the article: paint is the last step, not the first.
How to Test for Lead Paint | Ask This Old House
sbb-itb-a2baf13
Common Problems in Historic Homes Before Painting Starts
Historic homes in Morris County can go downhill fast when prep skips damage hiding under old paint. Local weather makes it worse, especially on exterior wood and trim. Before any painting starts, three things need a close look: lead, damaged materials, and preservation rules.
Lead Paint and Unsafe Surface Prep
Treat pre-1978 homes as lead-bearing unless testing shows otherwise. Many historic homes have layer after layer of paint on trim, windows, siding, and plaster. In a lot of cases, those older layers contain lead.
The problem isn’t just the paint itself. It’s what happens when someone removes it the wrong way. Under EPA RRP rules, paid work that disturbs painted surfaces in pre-1978 homes must follow certified lead-safe practices. Dry sweeping and sloppy cleanup can spread dust well past the work area. That dust is a serious health hazard, especially for children and pregnant women.
Wood Siding, Trim, and Plaster That Need Repair First
Common trouble spots include soft sills, rotted corner boards, split clapboards, failed caulk, and cracked or loose plaster. Painting over rot or open joints doesn’t fix anything. It just covers the damage for a while. Moisture keeps getting into the wood, and the new paint often starts peeling or blistering much sooner than expected.
Interior plaster is a different job. Historic homes often have cracks, areas where the plaster has pulled away from the wood lath, and holes left from old repairs or wiring work. The right fix uses compatible lime- or gypsum-based materials and secures the plaster before primer goes on.
Historic District and Design Review Limits
For historic homes, paint choices also need to line up with preservation rules. Some Morris County properties fall under local historic review rules that cover visible exterior changes, including siding, trim, windows, doors, and sometimes even colors or finishes. Homeowners may need to submit applications, photos, and a description of the proposed work before making changes that affect how the home looks from the outside.
That means painting work has to meet both repair standards and preservation rules. Getting clear on those limits early can save time, money, and a frustrating do-over if unapproved changes have to be reversed. With that sorted out, the work can move into lead-safe prep, needed repairs, and breathable coatings.
Practical Solutions That Protect Historic Materials
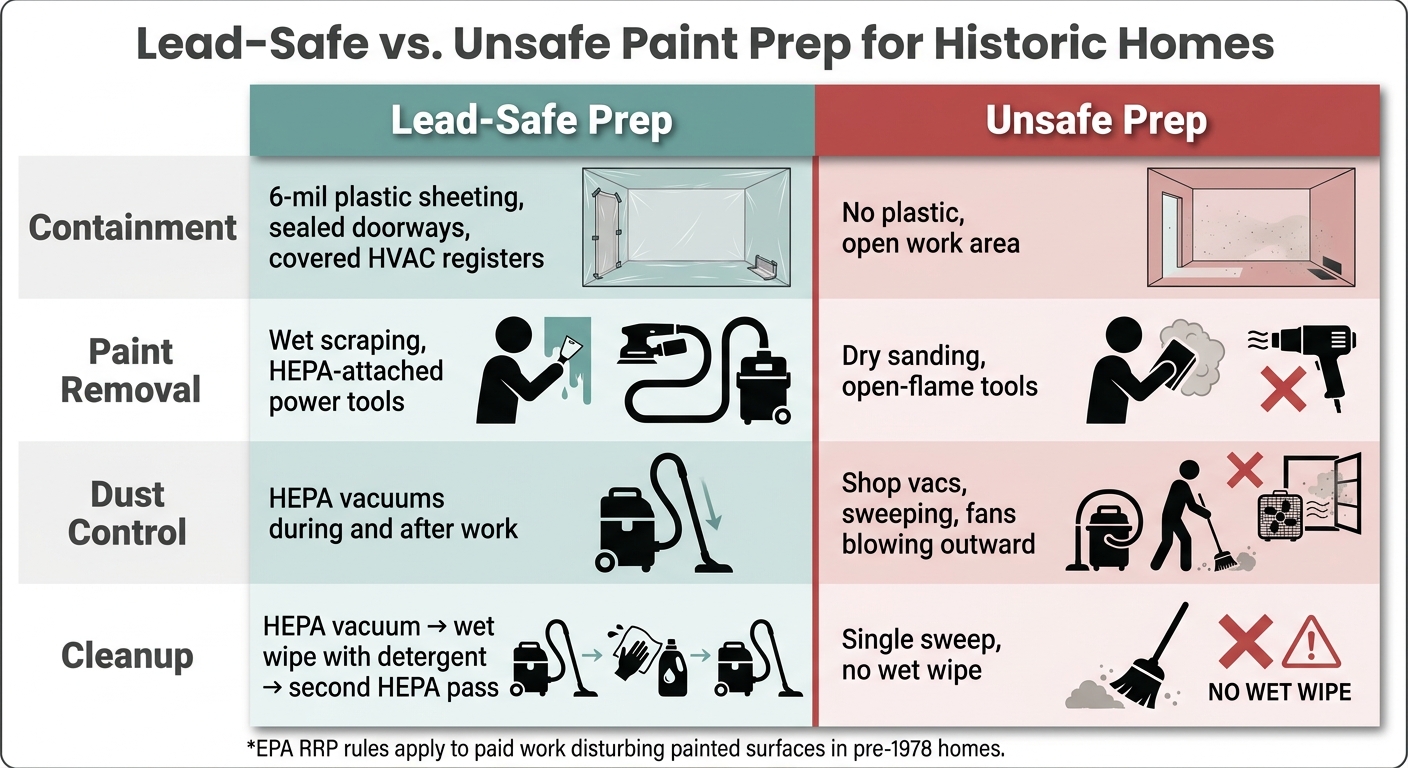
Lead-Safe vs. Unsafe Paint Prep: What Every Historic Homeowner Must Know
Once the home has been assessed, the focus moves to protecting the original siding, trim, and plaster through every stage of the job. From the first scrape to the final coat, the aim is simple: keep the old materials in place and treat them with care, not strip them away and start over.
Lead-Safe Preparation and Containment
For homes built before 1978, painted surfaces should be handled with EPA RRP-certified lead-safe methods whenever they’re disturbed. That starts with containment. In plain English, you want dust to stay put.
A proper setup includes 6-mil plastic sheeting on floors and nearby surfaces, sealed doorways, and covered HVAC registers so dust doesn’t drift through the house.
When it’s time to remove loose paint, use wet scraping, shrouded power tools hooked to HEPA vacuums, and sealed containment. Skip open-flame methods and dry sanding. Cleanup also needs more than one quick pass. The usual sequence is HEPA vacuuming, wet wiping with detergent, and then a second HEPA pass.
| Method | Lead-Safe Prep | Unsafe Prep |
|---|---|---|
| Containment | 6-mil plastic sheeting, sealed doorways | No plastic, open work area |
| Paint removal | Wet scraping, HEPA-attached tools | Dry sanding, open-flame tools |
| Dust control | HEPA vacuums during and after work | Shop vacs, sweeping, fans blowing outward |
| Cleanup | HEPA vacuum → wet wipe → second HEPA pass | Single sweep, no wet wipe |
Once dust is under control, the next job is fixing weak wood and cracked plaster before primer goes on.
Repairing Wood, Trim, and Plaster Before Primer
Before any patching or painting, fix the source of the trouble: flashing, gutters, caulk, and drainage issues. If water keeps getting in, even the best repair won’t last.
After moisture is dealt with, the goal is repair rather than replacement. Epoxy consolidants can harden partly decayed sills, columns, and trim so those pieces can stay in place. Epoxy fillers can then be shaped to match original details like drip edges, ogee curves, and tapered ends with hand knives and custom sanding blocks.
Inside, loose plaster can be reattached with plaster washers, then patched and feathered smooth. Lime- or gypsum-based patching materials tend to perform better on historic walls than generic joint compound.
After the surface is sound, the paint system needs to match how that material handles moisture.
Primers and Paints That Let Older Surfaces Breathe
Historic wood, plaster, and masonry don’t handle moisture the same way many newer materials do. If you seal them with a coating that doesn’t let vapor move through, moisture can get trapped inside. That’s when you start seeing blistering and peeling, and with wood, rot can speed up underneath paint that still looks fine from the curb.
Vapor-permeable systems help by letting moisture pass through while still blocking liquid water. On exterior wood, high-quality acrylic or alkyd-modified primers made for weathered substrates offer strong adhesion and flexibility. On previously painted masonry, mineral or silicate-based coatings are a better fit; standard acrylic masonry paints can still slow vapor movement too much for damp, solid masonry walls. For interior plaster, apply a breathable primer only after repairs have fully cured.
Choosing Colors and Finishes That Fit the Home
Once the surfaces are sound and primed, color and finish choices should line up with the home’s age and style. Start with the home’s style and build date, then use historic color collections from paint makers as a starting point instead of modern trend palettes.
Period-Appropriate Exterior and Interior Color Planning
Begin by identifying the home’s architectural style and approximate build date. That gives you a strong base for every choice that follows.
Late-19th-century homes often look best in muted, layered palettes. Think warm creams, soft earth tones, moss greens, and deep brownish reds. Simpler Colonial or Craftsman homes usually do better with a light-to-mid-tone body color, a medium trim color, and one stronger accent, like a deep green or navy door.
It helps to map color across the body, primary trim, secondary trim, and accents so the scheme stays simple and easy to read. On pre-1900 homes, pure white trim can feel too stark. Off-white, cream, or stone tones are usually a better historical fit, and they often sit better against aged wood. Mid-tone colors also tend to wear better in Morris County’s climate. Very dark colors show dust and fading faster, while very light colors can draw attention to flaws in older siding.
Inside the home, follow the same period logic, then adjust by how each room is used. Formal rooms like parlors and dining rooms can handle richer, more saturated colors. Deep greens, warm reds, or layered neutrals were common in Victorian-era homes. Hallways and stair halls usually do better with quieter, lighter colors so narrow spaces don’t feel tight. If you’re not sure what was used at first, a small paint-layer test can help uncover earlier colors.
From there, test large swatches on more than one elevation and check them at different times of day. Aged wood and historic brick throw color differently than new drywall. A shade that feels balanced in the morning can look very different by late afternoon.
Finish and Paint Type by Surface
After color comes sheen, and sheen should fit the surface. On large wall areas, especially interior plaster, higher sheens make every flaw stand out. Flat and matte finishes do a better job of hiding uneven spots and match the low-luster look often seen in older interiors. Trim, doors, and woodwork need something else. Satin or semi-gloss tends to hold up better to cleaning and wear, and that slight sheen helps small details show up a bit more clearly.
| Surface | Recommended Finish | Paint Type | Key Notes |
|---|---|---|---|
| Exterior wood siding | Matte or satin | High-quality acrylic latex | Flexibility and UV resistance |
| Exterior trim & details | Satin or low semi-gloss | Acrylic latex or alkyd-modified | Highlights profiles without looking artificial |
| Exterior doors & shutters | Semi-gloss | Acrylic or alkyd-modified exterior | Durable focal points; easier to clean |
| Interior plaster walls | Matte or eggshell | Low-VOC acrylic or mineral paint | Matte hides flaws; eggshell adds cleanability in traffic areas |
| Interior ceilings | Flat/matte | Low-VOC acrylic | Reduces glare; maximizes defect concealment |
| Interior wood trim & doors | Satin or semi-gloss | Acrylic or alkyd-modified enamel | Durable and emphasizes historic profiles |
| Historic masonry | Matte | Mineral, silicate, or lime-based coatings | Use mineral, silicate, or lime-based coatings. |
Avoid high-gloss on exterior wood. It tends to exaggerate grain, patches, and repair work.
When To Hire a Historic Painting Specialist in Morris County
Signs Your Project Needs a Professional
Once a historic home calls for lead-safe prep, structural repair, or design review, you’re no longer looking at a basic repaint. At that point, it makes sense to bring in a historic painting specialist. The same goes for homes that may contain lead, projects with large surface areas, or any job that will disturb old paint.
Professional help is the smart move when you’re dealing with widespread peeling or alligatoring, rotted or split wood siding, failing plaster, delicate original trim, hard-to-reach elevations, or ornate trim, windows, and porch details. These issues make it more likely that standard prep work will damage old materials, spread contamination, or cut short the life of the new coating. And if your home is in a local historic district, even an exterior color change may need review from the historic commission before work starts.
Rot and moisture damage must be fixed before repainting.
What 26 Painting, LLC Brings to Historic Projects
When a project crosses into that territory, proper handling matters. 26 Painting, LLC is EPA Lead-Safe Certified, licensed, and insured for pre-1978 homes. Their process begins with a surface evaluation to check for moisture, adhesion, and material issues before priming. That prep-first approach is what older wood, plaster, and masonry need if the finish is going to last.
Their services include interior and exterior painting, wood staining, and eco-friendly paint options that fit historic surfaces. Free estimates help spell out the scope and cost up front.
Conclusion: Preserve Character With the Right Methods and Planning
Historic homes in Morris County need careful prep, compatible materials, and the right level of skill to protect what gives them their character. A sound process helps protect original materials, keeps the home compliant, and helps you avoid costly rework.
FAQs
How do I know if my home has lead paint?
Check your home’s age first. You can usually find it in building permits, county records, or real estate paperwork. If the house was built before 1978, assume it has lead-based paint unless a test shows otherwise.
To confirm, you have a few solid options:
- Hire a certified lead inspector or risk assessor
- Ask a certified renovator to use an EPA-recognized test kit
If you’re not sure, play it safe. Treat the paint as if it contains lead and hire an EPA-certified professional for any surface work.
Do I need approval before painting my home’s exterior?
In most cases, yes. If your Morris County home is in a historic district, you’ll usually need approval before repainting the exterior so the home’s architectural character stays intact.
Before you start, check with your local preservation authority or neighborhood association to see what rules apply and whether you need approval for color or surface changes. And if your home was built before 1978, follow EPA lead-safe requirements when disturbing painted surfaces.
What paint works best on old wood, plaster, or masonry?
For historic homes, breathable, surface-appropriate paint is the way to go. Older materials need finishes that work with them, not against them.
Old masonry and brick tend to do best with mineral-based paints like Romabio or Keim. These paints let trapped moisture escape, which helps cut down on erosion, spalling, and mold. If brick can’t breathe, problems can pile up fast.
Historic wood siding usually calls for 100 percent acrylic paint. It has the flexibility and weather resistance that older wood needs as it expands and contracts over time.
Old plaster and wood often need careful prep before any topcoat goes on. In many cases, that means starting with a shellac- or oil-based primer, then following with a high-quality latex or alkyd-oil topcoat.