
If patched walls still show after paint, the problem is almost always bad prep. I’d focus on four things: make sure the patch is fully dry, sand it flat and wide, seal it with primer, and then paint the whole section so the sheen matches.
Here’s the short version:
- Dry time matters: small spackle repairs may dry in 30 to 60 minutes, but deeper joint compound repairs can take 24 to 48 hours.
- Feather the repair out: sand the patch 6 to 12 inches past the repair so there’s no hard edge.
- Primer is not optional: bare compound absorbs paint fast and can leave dull spots, flashing, or patch outlines.
- Use two paint coats: one coat often won’t hide sheen and texture changes.
- Watch humidity: in places like New Jersey, damp air can slow drying and lead to bubbling if you prime too soon.
I’d also keep an eye on the common failure points: dust left on the wall, smooth patches on textured walls, and spot priming that’s too small. If the wall has several patches, strong side light, stains, or older paint from before 1978, it may be time to bring in a pro.
That’s the whole job in plain terms: inspect, clean, sand, dry, prime, and repaint with the same texture and sheen.
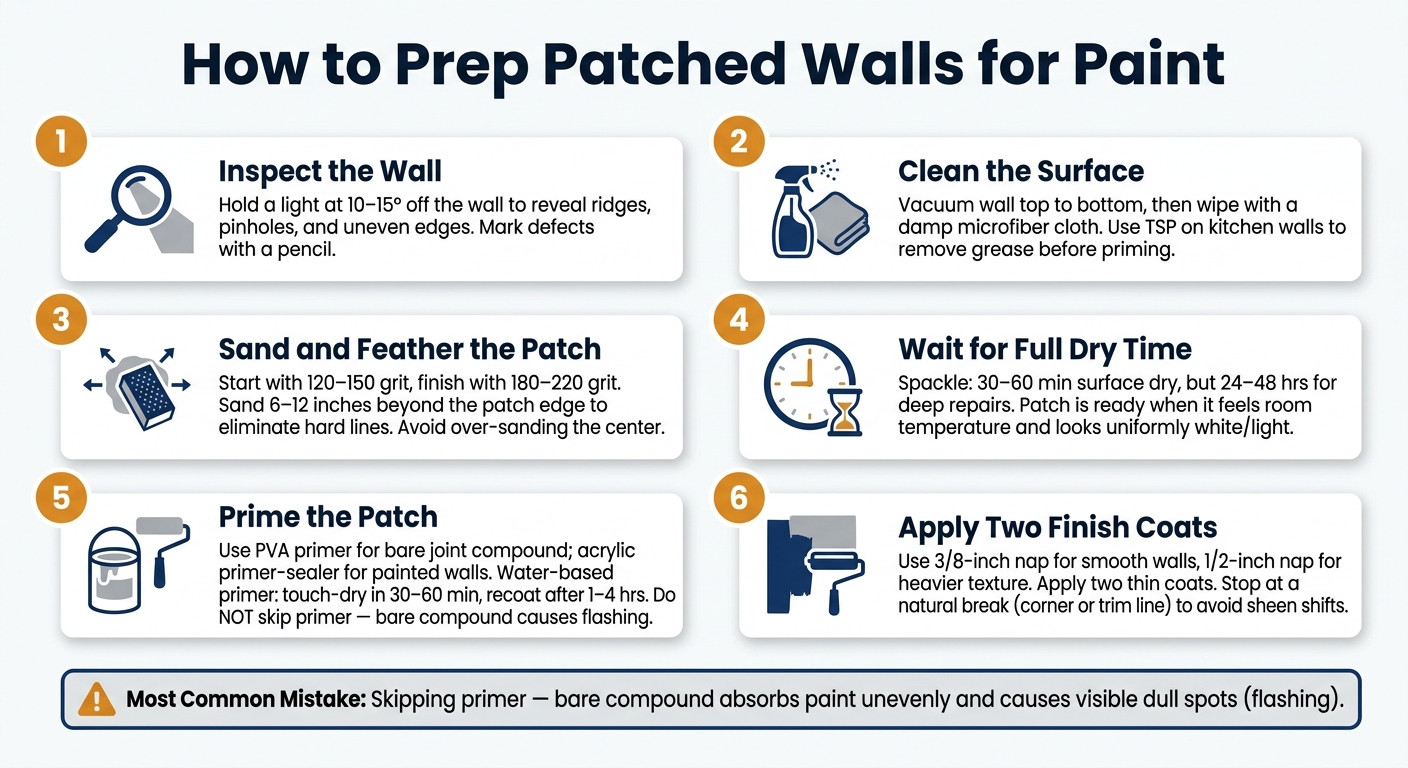
How to Prep Patched Walls for Paint: Step-by-Step Guide
How to prep and paint a drywall repair #drywallrepair
sbb-itb-a2baf13
Inspect and Clean the Wall Before Sanding or Priming
After the patch cures, take a close look at the wall and clean it before you sand. This is the time to spot every flaw. If you mark problem areas now, you can focus your sanding where it actually matters instead of guessing.
Prepare the Room and Protect Nearby Surfaces
Start by clearing the area. Move furniture out of the way, and take down wall hangings, shelves, curtains, and blinds. Put canvas drop cloths on the floor to catch dust and debris.
Next, remove outlet covers and switch plates. Keep the screws with each plate so nothing gets mixed up later. Apply painter’s tape along baseboards and trim, then press the tape edge down with a putty knife. That small step helps keep sanding dust and paint from slipping underneath.
Once the room is protected, check the patches under strong side light.
Find Ridges, Pinholes, Cracks, and Loose Repairs Using Good Lighting
Overhead light can make a wall look smoother than it is. To spot defects, hold a flashlight or work light at a low angle – about 10 to 15 degrees off the wall – and sweep it across each patch. That low-angle light throws shadows over ridges, pinholes, uneven edges, and other flaws that are easy to miss.
Mark each defect with a pencil so you can sand or fill it later. Then run your hand over each patch to feel for bumps, rough edges, or loose repairs. Your eyes catch some issues. Your fingers catch the rest.
After you’ve marked the trouble spots, get rid of dust before it causes problems with primer.
Remove Dust, Grease, and Residue So Primer Bonds Evenly
Before sanding or priming, vacuum the wall from ceiling to baseboard with a brush attachment. Then wipe the patched areas with a damp microfiber cloth to pick up leftover dust.
Kitchen walls need more cleanup. Grease and cooking oils can stop primer from bonding well. In those spots, use TSP or a TSP substitute to cut through the buildup. Rinse the TSP off all the way, then let the wall dry before sanding or priming.
After the wall is clean, sand the marked areas until they blend into the surface.
Sand and Dry the Patch Until It Blends Into the Wall
After cleanup, sanding gets rid of the last visible edge between the patch and the wall. The patch is only ready when it feels smooth to the touch and disappears under low-angle light. Once it passes that check, you can deal with any small flaws that are still left.
Sand with the Right Grit and Feather the Edges Outward
Start with 120- to 150-grit sandpaper to knock down high spots and shape the repair. Then switch to 180- to 220-grit for the last smoothing pass.
Use light pressure so you don’t tear the drywall paper around the repair. Sand 6 to 12 inches beyond the patch so the compound fades into the wall instead of stopping at a hard line. And don’t sand too much in the center. That can leave a shallow dip that stands out once paint goes on.
Fix Low Spots, Air Bubbles, Gouges, and Scraper Marks Before Painting
If you still see ridges, pinholes, gouges, or tool marks after sanding, fix them before priming. For pinholes, bubbles, gouges, or scraper marks, apply a thin skim coat of joint compound, let it dry all the way, then give it one light final sanding pass.
Wait for the Patch to Dry Fully Before Interior Painting
Spackle may look dry on the surface in 30 to 60 minutes, but deeper repairs can still hold moisture underneath. If you prime too soon, that moisture gets trapped and may cause bubbling, cracking, or discoloration within 48 hours.
Most patching materials need 24 to 48 hours to cure all the way, depending on patch depth, airflow, and indoor humidity. Before priming, touch the patch and make sure it no longer feels cool. Also check that the color looks lighter and even across the repair. Once the patch is fully dry and smooth, prime it to seal the repair and even out absorption.
Prime Patched Areas and Apply Paint for a Uniform Finish
Once the patch is dry and smooth, seal it before you paint. Joint compound and spackle are more porous than the painted wall around them, so they soak up paint in a different way. That can lead to flashing – dull or shiny spots where the sheen changes around the repair.
Primer helps stop that. It seals the patch and evens out absorption across the joint compound, drywall paper, and old paint so the final coat looks even.
Spot Priming vs. Full-Wall Priming: Which to Choose
Use spot priming for one small repair. Prime the whole wall if you have several patches, a sheen mismatch, or strong side light.
| Feature | Spot Priming | Full-Wall Priming |
|---|---|---|
| Coverage | Repaired area + 2–3 inch overlap | Entire wall, corner to corner |
| Labor | Low; quick application | High; full cutting-in and rolling |
| Cost | Minimal primer used | More primer |
| Flashing Risk | Moderate if not feathered carefully | Lowest; ensures uniform sheen |
| Best For | Small nail holes or minor scuffs | Numerous patches, sheen changes, or raking light |
For one small nail hole or a light scuff, use a 2-inch angled brush and apply primer right over the patch. Then feather it 2 to 3 inches into the paint around it so you don’t leave a hard edge.
Choose the Right Primer for Drywall Compound, Spackle, and Repaired Paint
Primers don’t all behave the same on patched walls. PVA drywall primer works best on fresh joint compound or big areas of new mud because it seals porous surfaces and bonds well. For patches on walls that were already painted, an acrylic primer-sealer works well across that mixed surface of old paint and bare compound.
If you still see light sanding marks after your last sanding pass, a high-build primer can help fill them before the finish coat goes on.
Water stains and smoke damage are a different story. Skip latex primers there, because stains can bleed through. Use a shellac-based or oil-based primer instead.
Dry time matters too. Water-based primers are often dry to the touch in 30 to 60 minutes, but they usually need 1 to 4 hours before you add the finish coat. Follow the label, then move on to paint.
Apply Two Finish Coats and Keep Texture and Sheen Consistent
After the primer dries, the finish coat needs to match the wall’s texture and sheen. Lightly sand the primed spot with 220-grit paper to knock down any raised roller nap or dust nibs before painting.
Then roll on the paint with a nap that matches the wall:
- Use a 3/8-inch nap for smooth walls or light orange-peel texture
- Use a 1/2-inch nap for heavier texture
Apply two thin finish coats. Run each coat to a natural stopping point, like a corner or trim line, so you don’t end up with a visible color or sheen shift in the middle of the wall.
Common Mistakes and When to Call a Professional
Even with good prep, one rushed step can make a patch stand out.
Mistakes That Leave Patches Visible After Painting
The table below shows the most common slipups, why they happen, and what to do instead.
| Mistake | Likely Cause | Correct Fix |
|---|---|---|
| Sheen changes | Skipping primer or spot-priming too narrowly | Prime the repair with proper overlap; use full-wall priming on high-sheen walls |
| Visible ridges or patch edges | Failing to feather edges outward | Feather edges wide before priming; do not leave a hard ring around the repair |
| Bubbling or peeling | Priming over damp or dusty compound | Prime only after the patch is fully dry and dust-free |
| Texture mismatch | Leaving a smooth patch on a textured wall | Match the wall texture with the right roller nap or texture spray |
| Shrinkage cracks | Applying one thick coat of compound | Build repairs in thin layers, not one thick coat |
One detail trips people up all the time: a combined paint/primer product will not seal bare compound. You need a dedicated primer.
When to Hire a Professional for Surface Prep and Painting
When several of these issues show up at the same time, you’re no longer dealing with a simple touch-up. That’s usually the point where bringing in a pro makes sense.
Consider getting help in cases like these:
- Multiple patches across one wall – If a room has three or more patches, getting one even finish gets much harder.
- Repeated flashing after previous attempts – If you’ve already painted over a patch and it still shows, the wall likely needs proper sealing.
- Complex texture matching – Orange peel, knockdown, and skip-trowel textures take the right tools and a practiced hand.
- High-visibility or commercial spaces – Rooms with strong side-light from large windows or sconces, or commercial properties where appearance matters, often need a Level 5 finish to stop show-through under paint.
- Homes built before 1978 – Sanding walls in older homes can disturb lead paint layers, so this is the safe time to call a pro.
If you want the prep handled from start to finish, 26 Painting, LLC provides professional surface preparation, drywall repair, and interior painting for residential and commercial properties in New Jersey.
Conclusion: The Key Steps That Make Patched Walls Disappear Under Paint
A patch disappears or stands out based on the small steps most people barely notice. First, inspect the wall under raking light. Then vacuum and wipe away all dust before priming. Sand the patch smooth and feather the edges 6–12 inches outward. Let the compound dry all the way until it’s pure white through the full patch. After that, prime with the right product for the surface – PVA for bare compound. Finish with two thin paint coats, and stop at a corner instead of trying to paint only the patch.
None of this is hard on its own. But skip one step – most of all primer – and the patch often shows up again after the paint dries. Surface prep does most of the heavy lifting. Paint is the final layer.
FAQs
How do I know the patch is truly dry?
Check the patch with your hand. If it feels cool, it’s still curing and may still hold moisture. It should feel neutral, not tacky or sticky.
In most cases, give it at least 24 hours before sanding. If the repair is deeper or the air is humid, wait longer. Trapped moisture can cause bubbling or adhesion failure later.
Do I need to prime the whole wall or just the patch?
It depends. Spot-priming is often enough for small repairs when the existing paint is in good shape and you’re using the same sheen.
Prime the entire wall if you have multiple patches, uneven porosity, a higher sheen, or strong side lighting. And always prime repaired areas to help prevent dull, flat-looking spots caused by porous joint compound.
Why does the patch still show after painting?
A patch can still show if the repair and the wall around it don’t match in porosity, texture, or shape.
Joint compound soaks up paint differently than painted drywall, which can lead to flashing. And if the patch isn’t perfectly flush or doesn’t match the wall’s texture, light can make it stand out even more.
As 26 Painting, LLC notes, proper sanding and priming help create a more seamless finish.