
Surface preparation is the foundation of any durable paint job. Skipping this step can lead to peeling, cracking, and costly repairs. Proper prep ensures paint adheres well, resists moisture, and lasts longer – up to 15 years compared to 3–5 years with poor preparation. Here’s what you need to know:
- Key Steps: Cleaning, repairing damage, sanding, and priming.
- Common Issues Without Prep: Peeling, blistering, uneven textures, and fading.
- Cost Implications: Poor prep leads to frequent repainting and higher expenses.
- When to Hire Pros: For older homes, moisture-prone areas, or large projects.
Investing time in preparation saves money, reduces maintenance, and improves results.
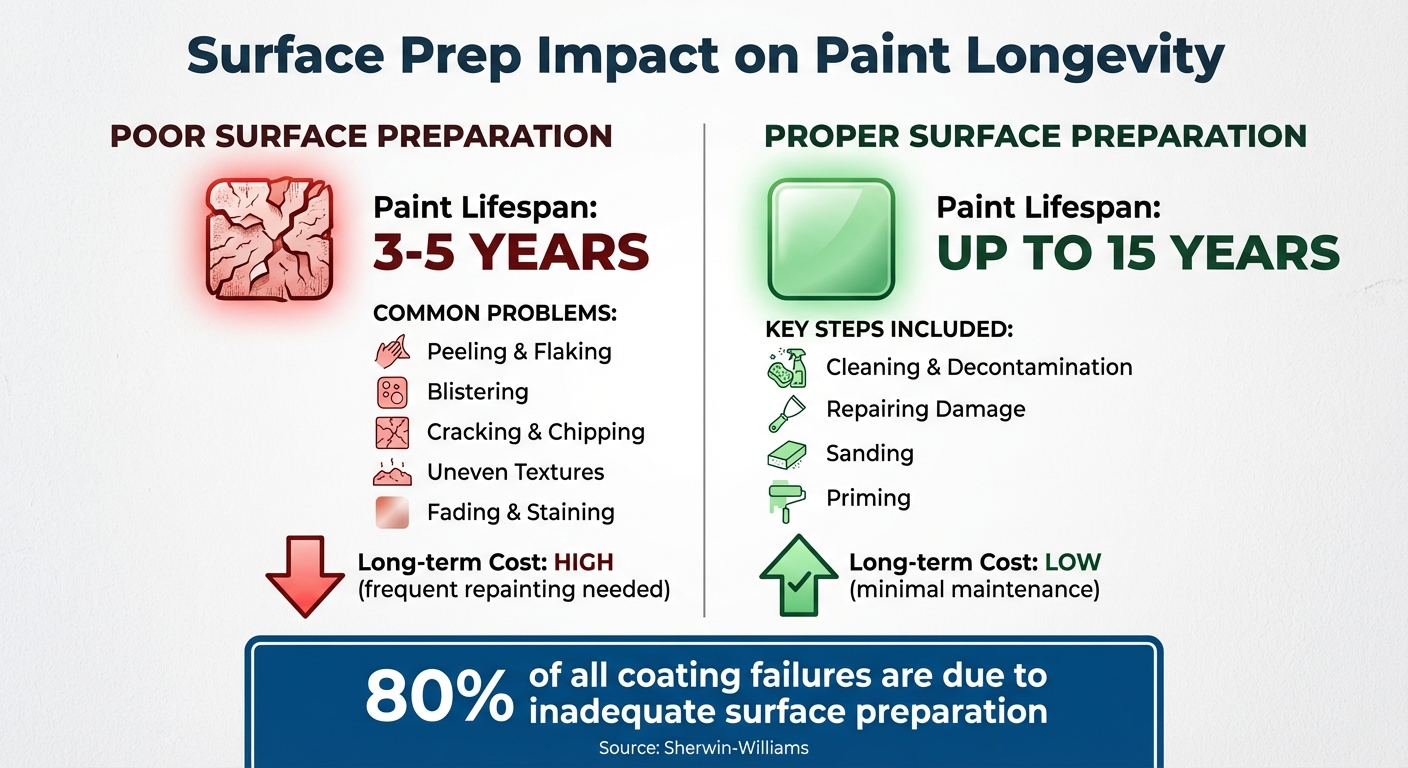
Paint Lifespan Comparison: Proper vs Poor Surface Preparation
How Important Is Exterior Paint Prep? | Expert Advice from Walls By Design

Problems Caused by Skipping Surface Preparation
Rushing or skipping surface preparation can lead to a host of problems, many of which show up quickly. Paint that doesn’t bond well to the surface starts to fail, creating both cosmetic and structural issues. These problems not only ruin the look of the project but can also lead to costly repairs. Proper preparation is the foundation of a durable, high-quality paint job, as emphasized earlier.
Peeling, Flaking, and Blistering Paint
When surfaces aren’t cleaned thoroughly, contaminants like dust, grease, or oil can block the paint from adhering properly. This weak bond causes the paint to peel or flake off over time.
Moisture is another common culprit. Painting over a damp surface – or not waiting the recommended 24–48 hours after pressure washing – traps water beneath the paint layer. With no way to escape, the moisture creates blisters that eventually burst, leading to peeling. Similarly, if exterior leaks go unfixed before painting, water can seep behind the paint and weaken its bond.
Chemical residues also pose a problem. For instance, manufacturing oils on galvanized metal or wax on composition board must be completely removed. Otherwise, the paint won’t stick. Sherwin-Williams highlights this issue, stating:
"Up to 80% of all coatings failures can be directly attributed to inadequate surface preparation, which affects coating adhesion".
When adhesion fails, the paint job not only looks bad but also leaves the surface vulnerable to further damage.
Cracking, Chipping, and Uneven Textures
Unrepaired cracks and holes in the surface become glaringly obvious after painting, creating uneven textures and leaving gaps for water to seep in. Over time, this can lead to wood rot or masonry damage.
Using the wrong repair materials can make matters worse. For example, applying a rigid filler to exterior wood is a common mistake. Wood naturally expands and contracts with temperature changes, and an inflexible filler will crack, causing the paint to pull away.
Fading, Staining, and Water Damage
Skipping primer on porous surfaces like bare wood or new drywall can lead to uneven paint absorption. This results in a blotchy finish and leaves some areas underprotected, making them prone to moisture damage and faster fading.
Another issue is biological growth. Mold and mildew must be treated before painting; otherwise, they’ll continue growing beneath the new coat. This not only causes visible stains to bleed through but can also pose health risks.
| Issue | Primary Cause | Resulting Paint Problem |
|---|---|---|
| Grease/Oil | Skipping solvent cleaning or detergent wash | Peeling and poor adhesion |
| Moisture | Painting too soon after rain or on damp surface | Blistering and bubbling |
| Glossy Finish | Skipping sanding or deglossing | Chipping and sliding off |
| Mold/Mildew | Painting over live spores without sterilization | Discoloration and bleed-through |
Increased Long-Term Costs
Cutting corners on surface preparation often leads to frequent repainting and repairs, which can become significantly more expensive than doing the job right from the start. Adrian Perez, Co-Owner and Project Manager at Jr’s Painting, explains:
"The difference between a paint job that lasts 3-5 years and one that looks great for 10-15 years often comes down to the quality of preparation work".
When paint fails prematurely due to poor prep, the entire surface may require professional remediation before repainting can even begin. This process often involves stripping the failed paint, repairing the substrate, properly preparing the surface, and then repainting – essentially doing the job twice. What might have been a small upfront investment in preparation becomes a much larger expense over time.
Beyond the financial burden, frequent repainting disrupts daily life. Furniture needs to be moved repeatedly, routines are interrupted, and the property may look unfinished for extended periods. These hidden costs make it clear that investing in proper surface preparation from the start is the smartest choice for any painting project.
How Proper Surface Prep Extends Paint Life
Skipping surface preparation can lead to a host of problems, but when done right, it can greatly extend the lifespan of your paint job. Proper prep ensures the paint adheres well, withstands weather, creates a smooth finish, and saves you money in the long run.
Creates Strong Adhesion and Bonding
Thorough preparation lays the groundwork for a strong bond between the surface and the paint. By removing contaminants and weak coatings, you create a stable base for the new paint. Sanding glossy surfaces gives them the rough texture needed for better grip . Stripping away loose or chalky paint ensures the fresh coat adheres to a solid foundation. Using primers further improves adhesion, as they seal porous materials and provide a consistent surface for the topcoat .
Protects Against Moisture and Weather Damage
Good prep work acts as a shield against moisture and weather-related damage. Filling cracks and holes prevents water from seeping in, safeguarding both the structure and the paint . On metal surfaces, removing rust and mill scale allows primers to seal the material, keeping air and moisture out. Treating mildew with a solution of one quart of bleach mixed with one gallon of water halts biological growth, ensuring mold or algae won’t develop under the paint. Additionally, applying caulk around windows and doors – focusing on vertical seams while avoiding horizontal ones between wood siding planks – helps block water while letting trapped moisture escape.
Produces a Smooth, Even Finish
A well-prepped surface is key to achieving a professional, polished look. Sanding eliminates flaws like drips, rough patches, and brush marks from previous coats. Primers also play a crucial role by sealing porous surfaces, ensuring the final coat looks smooth and even.
Reduces Maintenance and Repainting Costs
Investing time in surface preparation can make your paint job last significantly longer. A properly prepped surface can mean the difference between a finish lasting five years versus up to fifteen years. Paint applied to a clean and prepared surface often lasts 3 to 5 years longer than paint on untreated walls. This upfront effort pays off by reducing the need for frequent maintenance and saving money over time.
sbb-itb-a2baf13
Steps for Effective Surface Preparation
Achieving a durable and long-lasting finish starts with thorough surface preparation. By following a systematic approach, you can ensure proper paint adhesion and results that stand the test of time.
Cleaning and Decontamination
Before anything else, make sure the surface is clean, dry, and free of contaminants. Dirt, grease, mildew, and other residues can block paint from adhering properly. For large outdoor areas (over 500 square feet), a power washer is your best tool. For more delicate materials like vinyl siding, warm soapy water and a scrub brush will do the trick.
Different materials require specific cleaning methods:
- Metal surfaces (like aluminum or galvanized steel): Use a solvent cleaner to remove manufacturing oils.
- Steel with stubborn contaminants: Water blasting at 2,000 to 2,500 psi is effective.
- Concrete and masonry: Remove laitance, form release agents, and curing membranes that can interfere with adhesion. Always rinse thoroughly.
- Greasy interior surfaces: A trisodium phosphate (TSP) solution works well.
If mildew is present, it must be eliminated before painting. A simple solution of one part household bleach to four parts water will sterilize the area and kill spores. For glossy surfaces, lightly sand or use an abrasive cleanser to create a rough texture, which helps the paint bond better.
Once cleaning is complete, inspect the surface for damage and make necessary repairs.
Inspection and Repairs
Carefully check for cracks, holes, or failing paint. For cracks, widen them into a "V" shape to improve filler adhesion. Sand any sharp edges where old paint meets bare substrate, as these can show through new coats and lead to cracking.
When patching holes, apply filler in thin layers rather than one thick coat to prevent shrinkage and cracking. The type of filler you use should match the material:
- Wood: Use a high-quality wood filler or an elastomer-based product for exterior applications.
- Drywall: Spackling compound works best.
- Metal: Opt for an epoxy-based filler.
- Concrete: Use a cement-based compound.
For concrete, test for moisture by taping an 18-inch plastic sheet to the surface for 16 hours. If condensation forms, address the moisture issue before proceeding.
Sanding and Priming
Sanding is a crucial step to smooth imperfections and create a surface texture that primers can grip onto. For weathered exterior wood, 80-grit sandpaper is ideal for removing oxidation and exposing fresh material. On interior wood, always sand with the grain to avoid visible scratches in the final finish. After sanding, wipe away dust with a tack cloth or damp rag to ensure the primer adheres properly.
"Primer or undercoat has two primary purposes: To seal the substrate to prevent the chemistry of the substrate from migrating into and interfering with the chemistry of the finish coat and to help bind the finish coat to the surface being painted."
Primers are essential for sealing porous materials like new drywall and wood. They ensure even absorption and prevent stains or tannins from bleeding through the topcoat. Use the right primer for the job:
- Drywall and plaster: Latex primers work well.
- Hardboard: Alkyd primers are a good choice.
- Steel: Rust-inhibitive primers provide protection.
- New masonry: Alkali-resistant primers are ideal.
While spot priming can address specific areas, priming the entire surface is generally recommended for a uniform and professional finish.
When to Hire Professional Surface Prep Services
Taking on surface preparation yourself might work for straightforward tasks, but some situations call for the expertise and tools only professionals can provide. Knowing when to bring in the pros can save you time, money, and even protect your health. Here are some scenarios where hiring professionals is the smarter choice.
High-Wear and Moisture-Prone Areas
Spaces like kitchens, bathrooms, and exterior surfaces endure a lot of wear and are often exposed to moisture, making them tricky to prepare properly. Professionals use tools like moisture meters and infrared thermography to detect hidden water damage – problems that might escape the naked eye. For concrete floors, experts often employ acid etching to create a strong bond for coatings. In kitchens, where grease buildup is common, solvent cleaning (SSPC-SP1) is used to remove residues that water-based cleaners can’t tackle.
Older Homes with Surface Issues
Older homes come with their own set of challenges, including potential lead-based paint hazards and significant surface deterioration. Homes built before 1978 may have lead paint, which can release toxic dust when disturbed. Professionals handle this with HEPA-filtered respirators, containment systems, and lead-safe certifications to ensure safety. When coatings are extensively cracked, peeling, or flaking – more than 25% of the surface – professionals often strip them entirely using industrial chemicals or heat tools to reach a stable base. Additionally, issues like deep wood rot, heavy rust, or mill scale require advanced techniques such as white metal blast cleaning or power tools like needle guns and grinders.
Large or Complex Projects
Big projects, like preparing multistory buildings, come with logistical and safety challenges that go beyond the average homeowner’s capabilities. These jobs often require scaffolding, aerial lifts, and specialized safety equipment. Professionals also pay close attention to environmental conditions, avoiding work when temperatures dip below 50°F or when surfaces are damp from recent rain, as these factors can compromise adhesion. For materials like structural steel, masonry, or concrete, advanced preparation techniques are essential. For example, preparing cement composition siding might involve power washing at a pressure of at least 2,100 psi to remove contaminants effectively. Poor surface preparation is one of the main reasons coatings fail, making professional expertise critical for large or complex projects.
26 Painting, LLC provides EPA Lead-Safe Certified services to ensure durable and safe surface preparation results.
Conclusion
Surface preparation is the key to a paint job that lasts. Whether it’s peeling, cracking, or costly repairs, skipping this step often leads to problems down the line. Taking the time to properly prepare surfaces can make the difference between a finish that lasts 5 years or one that holds up for 15. It’s not just about aesthetics – it’s about protecting your property and reducing the need for frequent repairs.
Steps like cleaning, sanding, and priming lay the groundwork for a durable and long-lasting paint job. These efforts safeguard your property’s structure while keeping it looking its best for years.
For homeowners and businesses in New Jersey, where moisture and weather can wreak havoc on poorly prepped surfaces, professional preparation is especially important. By investing in proper surface prep, you can minimize repaints, cut maintenance costs, and maintain your property’s value. 26 Painting, LLC ensures every project starts with thorough preparation, whether it’s interior sanding and patching or exterior power washing, siding repair, and caulking. Their EPA Lead-Safe Certified methods also make them a trusted choice for older homes, offering both safety and durability.
"Thorough surface preparation pays off in the long run by minimizing the need for premature repainting or extensive repairs, resulting in cost savings over the lifespan of the paint job." – 26 Painting, LLC
From high-traffic areas like kitchens and bathrooms to moisture-sensitive exteriors and large-scale commercial projects, 26 Painting, LLC delivers meticulous preparation to protect your investment. Their attention to detail ensures long-term durability and peace of mind.
FAQs
Why is surface preparation important for a durable paint job?
Surface preparation is the foundation of any paint job that lasts over time. It begins with thoroughly cleaning the surface to eliminate dust, dirt, grease, peeling paint, or anything else that might interfere with the paint’s ability to stick. Afterward, it’s important to address any flaws like cracks, nail holes, or gaps by using patching compounds and sanding them smooth. For surfaces such as wood, metal, or masonry, a bit of sanding or abrasive cleaning helps create a texture that allows the paint to adhere more effectively.
Before painting, make sure the surface is completely dry and in good shape. For exterior projects, aim for temperatures above 50°F and avoid days with rain or fog in the forecast. To wrap up preparation, applying a high-quality primer designed for the specific material ensures better adhesion, hides stains, and improves the paint’s durability. At 26 Painting, LLC, we stick to these steps carefully to provide professional, long-lasting results every time.
Why is surface preparation important for durable paint jobs?
Proper surface preparation plays a key role in ensuring your paint job not only looks great but also stands the test of time. Taking the time to clean the surface, fix any imperfections, and create a smooth, primed base helps the paint adhere better. This strong bond minimizes the chances of peeling, cracking, or blistering, while also extending the life of the paint – sometimes by an extra 3–5 years or more.
Skipping these steps might save time initially, but it often leads to premature paint failure, which can be costly to fix. A little extra effort upfront can make all the difference, delivering a polished, long-lasting finish that’s worth the investment.
When is it best to hire professionals for surface preparation before painting?
If your surface has problems like peeling or loose paint, visible damage, or signs of moisture, it might be time to call in the pros. Professional help is also a smart move if you lack the tools or know-how to clean and prep the area correctly. Skipping these steps can lead to paint issues and shorten the lifespan of your finish.
Experts know how to tackle these challenges effectively, leaving you with a smooth, clean surface that helps your paint job stand the test of time. Choosing professional preparation can save you time, energy, and the expense of future repairs.