
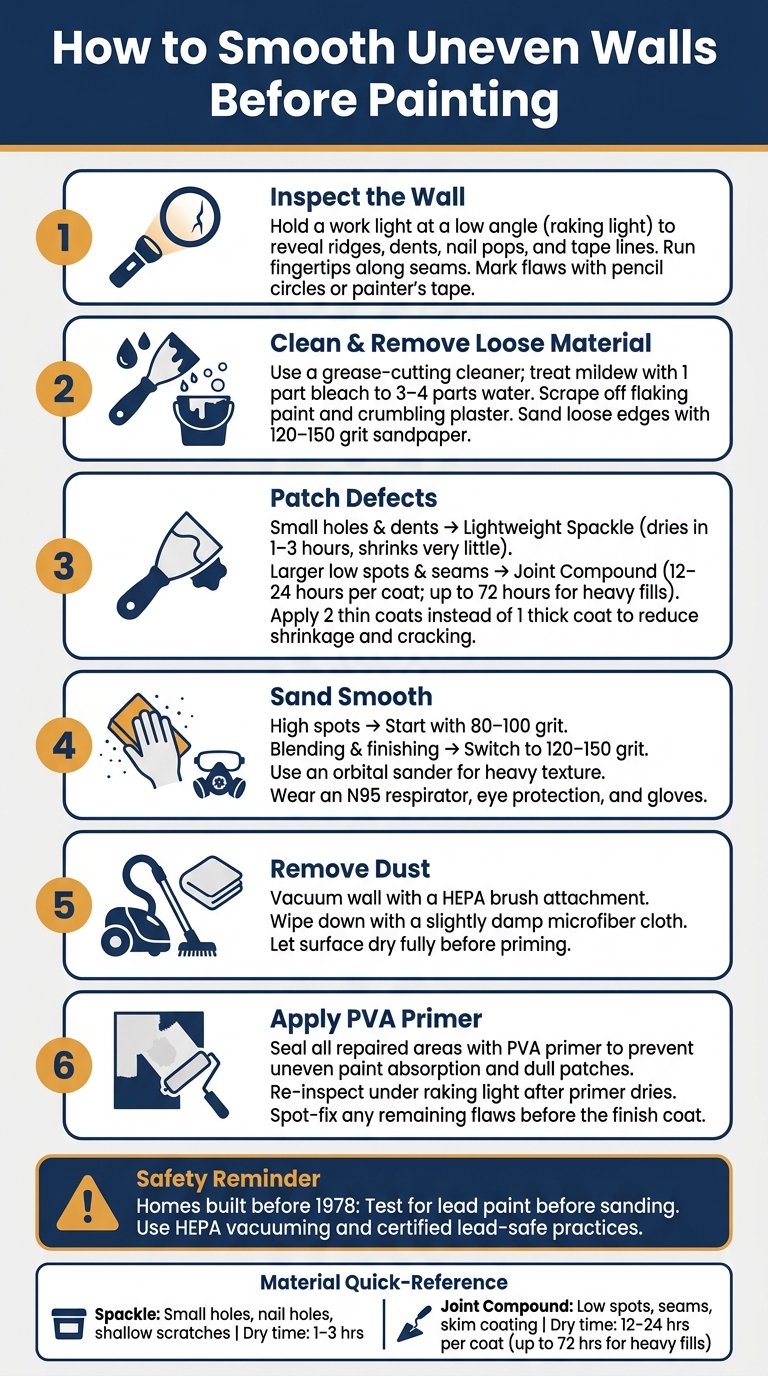
Paint makes wall flaws stand out, not disappear. If I want a smooth interior painting finish, I need to inspect the wall, clean it, fill holes and low spots, sand high spots, remove dust, and prime before painting.
Here’s the short version:
- Small holes and dents: use lightweight spackle
- Low spots, seams, and rough patches: use joint compound
- Sanding grit: start around 80–100 grit for high spots, then use 120–150 grit to smooth repairs
- Dry times: spackle often dries in 1–3 hours; joint compound can take 12–24 hours per coat
- Dust control: wear an N95, protect floors with canvas drop cloths, and wipe walls with a damp microfiber cloth
- Final step before paint: apply PVA primer so patched areas don’t soak up paint unevenly
I’d also check the wall with a light held at a low angle, because side light shows dents, ridges, and tape lines fast. And if the home was built before 1978, I’d test for lead paint before sanding or scraping.
If the wall has heavy texture, room-length waves, or needs full skim coating, that may be a job for a pro. Otherwise, the basic path is simple: find flaws, patch them, sand flat, clean well, and prime.
How to Smooth Uneven Walls Before Painting: Step-by-Step Guide
Skim Coating | Smooth Walls For Painting | Bathroom Makeover On A Budget EP.7
sbb-itb-a2baf13
Tools, materials, and safety setup
Get your tools together before you start patching, sanding, or cleaning up dust. You’ll want 6-inch, 10-inch, and 12-inch drywall knives, a sanding block or sponge, an orbital sander for heavier texture, a scraper, painter’s tape, drop cloths, mild detergent, joint compound, lightweight spackle, and PVA primer.
Each tool has its lane:
- The 6-inch knife works best in tight spots, corners, and small patches.
- The 10-inch and 12-inch knives help feather edges and spread compound across bigger areas.
- A sanding block or sponge gives you more control on repairs and curved spots.
- An orbital sander helps with heavier texture.
- A scraper clears off flaking paint and dried ridges before patching.
Once your tools are set, the next step is simple: use the filler that fits the damage.
Choose the right repair material for your wall condition
The filler you pick makes a big difference. Lightweight spackle works best for small nail holes, pinholes, minor dents, and shallow scratches. It usually dries in 1–3 hours and shrinks very little, so it sands easily and lets you move on fast.
Joint compound is a better fit for wider low spots, visible tape seams, failed patches, and skim coating larger areas. It usually needs 12–24 hours per coat to dry, and heavier fills can take up to 72 hours before sanding. For better results, apply two thin coats instead of one thick one. That helps cut down shrinkage and cracking.
Once you’ve picked the filler, prep the room before the sanding starts.
Protect the room and control sanding dust
Move furniture to the center of the room and cover the floors with canvas drop cloths. Canvas stays put, soaks up drips, and isn’t as slick as plastic sheeting. Before sanding, tape off trim, baseboards, and window edges with painter’s tape.
Drywall dust gets everywhere. It’s fine, light, and easy to spread through a room. Wear a NIOSH-approved N95 respirator, eye protection, and gloves while sanding. In lived-in spaces, use a vacuum sander or wet-sand small spots with a damp sponge to keep dust down. When you’re done sanding, wipe the walls with a damp microfiber cloth.
For homes built before 1978, test for lead paint before sanding or scraping. If lead is present, use certified lead-safe practices, including HEPA vacuuming and proper work area containment.
When to call a professional instead
Some jobs are better left to a pro. That includes whole-room skim coating, full-room texture removal, or patches that keep failing even after repair.
Drywall contractors generally charge $50 to $100 per hour. Professional skim coating usually runs $0.95 to $1.35 per square foot. For that kind of work, a service like 26 Painting, LLC can help get the flat finish you want. Small repairs can move next into inspection and surface prep.
Inspect and prepare the wall surface
Once the room is protected, check the wall under raking light before you patch anything. Tiny flaws can look minor now and still jump out once the paint dries.
Find ridges, dents, and waves using light and touch
Use raking light by holding a work light low and aiming it across the wall. That low-angle light throws shadows that make ridges, tape lines, nail pops, and shallow valleys much easier to spot than standard overhead lighting.
After that visual check, run your fingertips or the edge of a flexible putty knife across seams and transitions. If you can feel a step or bump, it will show after painting. Then tap any area that seems off with your knuckle. A hollow sound usually means the wall is loose and needs more than a skim patch.
Mark each problem spot as you go with a light pencil circle or a small piece of painter’s tape. That way, you won’t lose track of repairs once you start moving around the room.
For broad waves, hold a 12-inch taping knife flat against the wall. If you see a gap between the blade and the surface, that’s a low spot that needs filler before paint.
Clean the wall and remove loose material
After you’ve marked the defects, clean the wall so the filler sticks to solid material. Use a grease-cutting cleaner for kitchen grime, then rinse well. If you find mildew, treat it first with a bleach mix of one part bleach to three or four parts water before washing.
Use a putty knife or paint scraper at a low angle to lift any flaking or peeling paint until you reach a stable edge where the remaining coating is firmly bonded to the substrate. Then sand those edges with 120- to 150-grit sandpaper to feather the transition so it can’t be felt by touch.
Take off any loose material, including:
- Flaking paint
- Crumbling plaster
- Protruding fasteners
All of that needs to go before you patch the wall.
Patch defects and smooth uneven areas
With the defects marked, start small and then work out toward the larger uneven spots.
Fill small holes, dents, and scratches
Use spackle for pinholes, nail holes, and shallow scratches. If you see hairline cracks, open them a bit first with a utility blade. That gives the filler a better shape to grip.
Press the spackle into the defect with a putty knife held at a low angle. Then pull the knife outward so the patch blends into the wall. Slightly overfill each spot. Spackle shrinks as it dries, and it’s easier to sand a patch flat when it dries a little proud instead of low. Keep the coats thin, too. Thick fills tend to shrink and crack.
Once it’s fully dry, sand with 120- to 150-grit sandpaper until the patch is flush.
If the damage is deeper or spreads out more, switch to joint compound.
Use joint compound for larger low spots and failed patches
Use joint compound for wider repairs, failed patches, and deep seams. Add a small amount of water to premixed compound until it feels thick but still easy to spread.
Apply it with a 10- to 14-inch drywall knife held at a 15- to 20-degree angle. Use smooth strokes to fill the low spot. On each pass, extend 6 to 12 inches past the damaged area so the edge blends in.
Plan for a few thin coats. Let each coat dry all the way, sand it lightly, and then add the next one.
Once the low spots are built up, knock down any high points and skim coat any broad texture.
Sand high spots and skim coat textured or wavy walls
Start on small high spots with 80- to 100-grit paper. Then move to 120- to 150-grit to blend the area into the surrounding surface. After sanding, vacuum the wall and wipe it with a damp microfiber cloth.
If the wall has heavy texture or damage spread across a big area, sanding alone usually won’t do the job. In that case, apply a thin layer of premixed lightweight compound with a wide 12- to 14-inch knife using long, overlapping passes. A skim coat gives you the smoothest finish.
After the surface feels even, clear away all dust before priming.
Prime, recheck, and get ready for paint
Remove dust and do a final surface check
After the last sanding pass, clear off the dust before you prime. Vacuum the wall with a HEPA brush attachment, then wipe it down with a slightly damp microfiber cloth. Let the surface dry fully before priming.
Once the wall is clean and dry, check it again with raking light. That side-angle light makes missed spots stand out fast. Fill any flaws you still see, sand them lightly, and wipe away the dust.
Apply PVA primer and make final touch-ups
Fresh compound and skim coats can soak up paint unevenly. The result is dull patches and uneven sheen, which tends to show up more on eggshell or glossier finishes.
Apply PVA primer to seal the repaired areas and help missed flaws show themselves. After the primer dries, inspect the wall again and spot-fix anything that still stands out before the finish coat goes on.
Conclusion: Smooth walls lead to a cleaner paint finish
Smooth walls come from a clean sequence: inspect, repair, sand, clean, prime, and touch up. If the job is bigger than you want to tackle – or you want dust-controlled prep – 26 Painting, LLC can handle the surface work.
FAQs
Do I need to skim coat the whole wall?
It depends on how bad the wall looks. If it’s flat, clean, and even, you may not need a skim coat at all. For small dents or a few holes, spot patching and sanding are usually enough.
A full skim coat makes sense when you’re dealing with broad waviness, heavy texture, lots of patched areas, or seams you can still see. It also helps when you plan to use high-gloss finishes or the wall gets strong raking light, since both can make small flaws stand out fast.
How do I know if a wall flaw is too big to DIY?
Minor flaws like small holes, dents, or shallow cracks are usually DIY-friendly. In many cases, spackling compound, mesh patches, and light sanding are enough to smooth things out.
It changes when you spot structural movement, broad waviness, moisture damage, crumbling plaster, or hollow sounds when you tap the wall. Those are signs the issue may run deeper than the surface. For more involved repairs, 26 Painting, LLC offers professional interior painting and prep services for a durable finish.
Can I paint without priming patched areas?
No. Patched areas should be primed before painting.
Joint compound is more porous than the painted wall around it, so it soaks up paint in a different way. If you skip primer, the patch can look dull or blotchy. That issue is called flashing.
Primer seals the patch and helps the paint dry to a more even finish.