
The lowest painting bid is often not the lowest job cost. I compare estimates by matching the scope, prep, paint, labor, cleanup, schedule, payment terms, warranty, exclusions, and insurance before I look at the final price.
Here’s the short version:
- I make sure each estimate lists the same surfaces: walls, ceilings, trim, doors, closets, exterior trim, decks, fences, and other areas
- I check whether prep work is spelled out: washing, scraping, sanding, patching, caulking, and priming
- I look for the exact paint brand, product line, finish, and coat count
- I review whether labor and materials are broken out instead of shown as one lump sum
- I confirm cleanup, disposal, furniture moving, and protection details
- I check the start date, work hours, finish window, payment schedule, and warranty
- I flag vague bids, especially if one is 30%+ lower than the others
A painting estimate is not just a price. It’s a written plan. If one bid says “paint bedroom” and another says “walls, ceiling, trim, two doors, closet, patching, spot-prime, two coats satin,” those are not the same job.
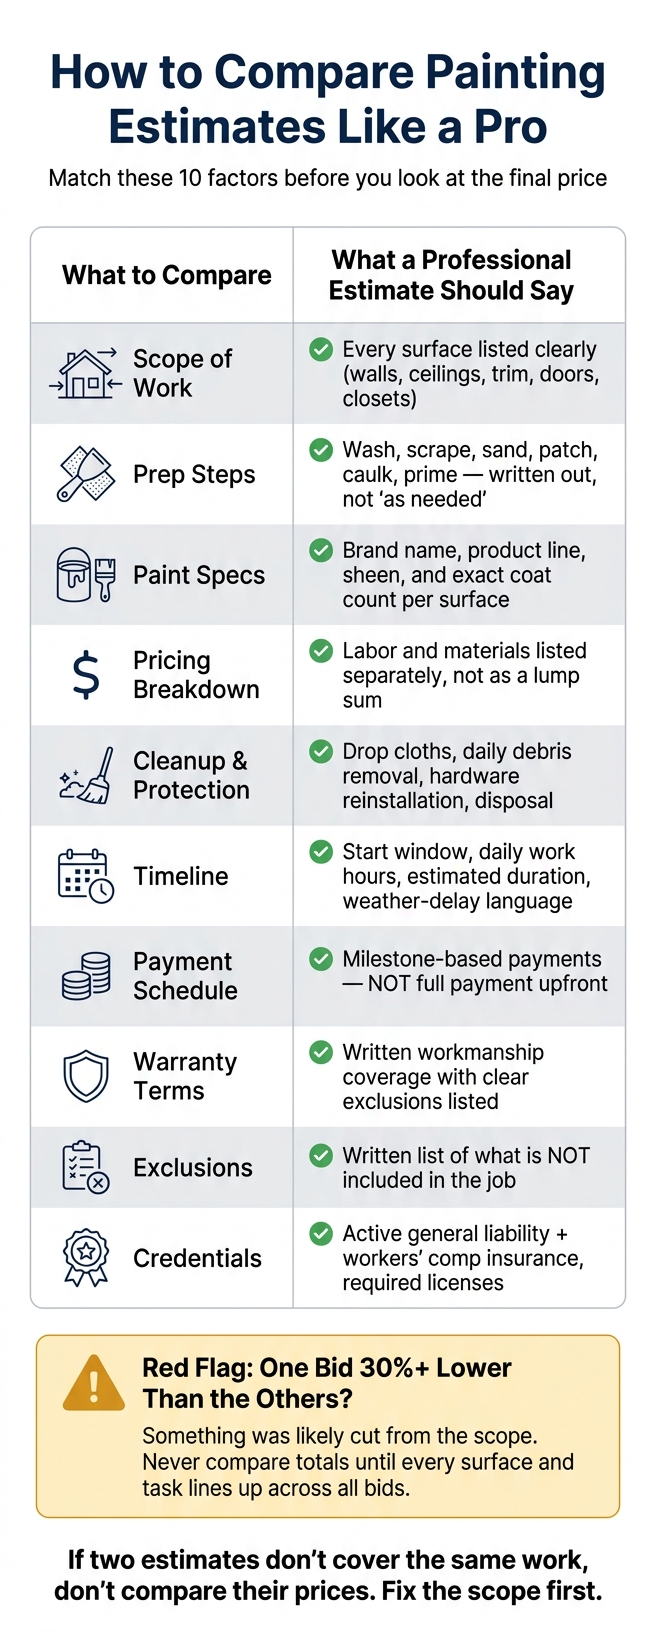
How to Compare Painting Estimates: 10-Point Checklist
Quick Comparison
| What I compare | What I want to see |
|---|---|
| Scope | Every surface listed clearly |
| Prep | Written steps, not “as needed” |
| Paint | Brand, line, sheen, coats |
| Pricing | Labor and materials broken out |
| Cleanup | Protection, daily cleanup, disposal |
| Schedule | Start window, duration, work hours |
| Payment | Milestones, not full payment upfront |
| Warranty | Written coverage and exclusions |
| Credentials | License and insurance details |
| Exclusions | Clear list of what is not included |
My rule: if two estimates do not cover the same work, I do not compare their totals. I fix the scope first, then compare price.
sbb-itb-a2baf13
Line Up the Scope of Work Side by Side
Once each estimate covers the same basics, compare them side by side, surface by surface. Most price differences come down to scope gaps.
Match Every Surface Listed in Each Bid
"Paint bedroom" is too vague. It doesn’t tell you if the ceiling is included, if the trim and baseboards are part of the job, or if the closet interior gets painted too. A professional scope spells out every surface – for example, "living room walls, ceiling, baseboards, two doors, and trim around three windows".
Go through each bid and mark every surface as included, excluded, or unclear. That sounds simple, but it’s where a lot of homeowners miss the fine print.
For interior projects, check items like:
- walls, ceilings, trim, baseboards, crown molding, wainscoting
- doors, frames, closets, and built-ins
For exterior projects, verify siding, soffits, fascia, trim, shutters, railings, decks, fences, and garage or concrete floors. If any surface is marked unclear, get a written answer before you move ahead.
Check for Missing Tasks That Can Change the Price Later
This is where cheap bids often start to crack. A lower number can look great at first, then extra charges start piling up once the work begins.
Furniture moving, wall hangings, switch plates, vents, and hardware removal are often left out of the first estimate and added later as change orders. A solid estimate should also spell out exclusions – like closet interiors or crown molding – so there isn’t any confusion later.
The table below shows how the same project can look very different across three estimates when you break it down line by line:
| Surface / Task | Estimate A | Estimate B | Estimate C |
|---|---|---|---|
| Walls | Included | Included | Included |
| Ceilings | Included | Excluded | Unclear |
| Trim & Baseboards | Included | Included | Excluded |
| Doors & Frames | Excluded | Included | Included |
| Closet Interiors | Excluded | Excluded | Unclear |
| Crown Molding | Included | Excluded | Excluded |
| Furniture Moving | Excluded | Included | Excluded |
| Hardware Removal | Included | Excluded | Unclear |
| Caulking & Sanding | Detailed | "As needed" | Not listed |
| Cleanup & Disposal | Included | Included | Excluded |
The total price means very little until every surface and task lines up side by side.
Once the scope matches, compare surface preparation, paint products, and coat coverage.
Review Prep Work, Paint Products, and Coat Coverage
After you match the scope, the next step is to compare how each contractor plans to prep and finish the surface. This is where a lot of price differences start to make sense. Prep details and paint specs often tell you why one bid is lower than another – and what kind of finish you can expect years from now.
Preparation Steps Should Be Written Out Clearly
A professional estimate should spell out each prep task by surface. Look for clear action words like wash, scrape, sand, patch, caulk, and prime. These should appear as line items or be plainly described in the scope.
For exterior work, that usually means power washing to remove dirt, mildew, and efflorescence. For interior work, it should say whether drywall cracks, nail pops, or holes will be patched – and up to what size.
Caulking should also be specific. It should name the areas being treated, such as trim joints, window gaps, and seams. A vague note like "prep not specified" doesn’t tell you much.
Primer needs its own line too. Full prime and spot prime are not the same thing. If a surface has water stains or smoke marks, the estimate should call for a stain-blocking primer, not a standard primer. If the surface is glossy, it needs a bonding primer so the paint sticks. When those details are missing, the prep plan isn’t complete.
Next, compare the exact paint line, finish, and coat count.
Compare Paint Brand, Product Line, Finish, and Number of Coats
Once prep is covered, look at the actual paint products. Phrases like "premium paint" or "contractor-grade" without a brand name are a red flag. A complete estimate should name the manufacturer, the product line, the sheen, and the number of finish coats for each surface.
For example: "Two coats Sherwin-Williams Duration, Satin finish on walls."
That level of detail matters. One coat of a premium paint is not the same as two coats of a lower-cost product. Premium lines usually do a better job than cheaper paint.
Use this checklist for prep and materials:
| Detail | What a Professional Estimate Should Say |
|---|---|
| Surface Cleaning | Power washing (exterior) or degreasing (cabinets/interior) |
| Repairs & Patching | Drywall cracks, nail pops, holes up to a specified size |
| Caulking | Specific areas (trim, joints, gaps) and sealant type |
| Primer | Full prime vs. spot prime; stain-blocking or bonding primer where needed |
| Paint Product | Manufacturer name and product line (e.g., Sherwin-Williams Duration) |
| Sheen/Finish | Specific finish per surface (Flat, Eggshell, Satin, Semi-gloss) |
| Number of Coats | Exact coat count per surface, not "as needed" |
If any row is blank or vague, you’re not comparing the same job.
Once prep and product specs line up, move on to labor, materials, cleanup, and terms.
Compare Labor, Materials, Cleanup, Timeline, and Warranty Terms
Once prep and paint specs are set, the next step is the contract. This is where the actual cost starts to come into focus.
Two estimates can look close at first glance. Then you read the fine print and realize one includes more prep, better cleanup, a clearer schedule, and written warranty terms. That stuff matters.
Read the Labor and Materials Breakdown Carefully
Labor usually makes up about 80% of the value of a painting project. So when one bid comes in far lower or higher than another, the gap often comes from labor, not paint.
That’s why it helps to see whether the estimate breaks labor out by phase, like prep, priming, and finish coats, or just gives you one big lump sum.
A solid estimate separates labor by task and lists materials with quantities and unit costs. It should also spell out who handles furniture moving, surface masking, and disposal of leftover paint or hazardous materials. Materials matter too, so they should be itemized in plain terms.
You should also look for an exclusions section. A professional estimate should state what is not included, such as rot repair, high-access areas, or moving heavy furniture. That can save everyone a headache if issues come up mid-project.
Check Dates, Payment Terms, and Warranty Coverage
A dependable estimate includes the start window, daily work hours, projected duration, and weather-delay language for exterior work. If there’s no timeline at all, take that seriously. It’s a warning sign.
Payment terms should connect to completed milestones. In other words, you pay as work gets finished, with the final payment due after the walkthrough and punch-list sign-off. Never agree to pay the full amount before the job is done.
Warranty terms need to be in writing, not tossed out in conversation. A strong estimate separates the contractor’s workmanship warranty from the paint manufacturer’s warranty. It should also explain what the warranty covers, such as peeling, blistering, or adhesion failure, and what it does not cover, such as moisture intrusion, settling cracks, or roof leaks. A vague “guaranteed work” line without written terms doesn’t give you much to stand on.
Use this checklist to compare the contract terms that affect cost and dependability.
| Category | What a Professional Estimate Should Say |
|---|---|
| Timeline | Start window, daily working hours, projected duration, and weather-delay language for exterior work |
| Cleanup & Protection | Daily debris removal, hardware reinstallation, leftover paint labeled and left with the owner, drop cloths, and masking details |
| Payment Schedule | Milestone-based payments tied to completed work phases |
| Warranty Terms | Written coverage for workmanship, clear exclusions, and separate manufacturer warranty details |
If any row is blank or vague, put it on your red-flag list.
Pick the Best-Value Estimate and Watch for Red Flags
Once the scope, prep, products, and contract terms match up, make one last pass. This is where you separate a fair price from a bid that could turn into a mess later.
Red Flags in a Low or Vague Bid
If one bid comes in 30% or more below the others, there’s a good chance something got cut from the scope.
Here are the warning signs to watch for:
- Vague prep language like "prep as needed" or "standard prep" instead of clear steps
- No paint brand or product line listed – phrases like "contractor-grade paint" are a red flag
- Lump-sum pricing with no breakdown for labor or materials
- No exclusions section – if there’s no list of what’s not included, disputes get a lot more likely
- Large upfront payment requests – especially cash-only requests or full payment before the job starts
- No license, address, or insurance details in the header
- Handwritten bids or estimates on a business card
- No certificate of insurance sent directly from the agent
For homes built before 1978, require EPA Lead-Safe practices. That setup and disposal work adds cost, so the estimate should account for it.
Use the checklist below to make sure the estimate covers each key term before you sign.
Final Checklist for Choosing the Right Painter
Before signing, go line by line. Every item below should have a clear written answer in the estimate. If the wording feels fuzzy, that’s your cue to press for details.
| Check | Should Say |
|---|---|
| Scope of work | Every surface listed with action verbs |
| Prep steps | Cleaning, sanding, scraping, caulking, priming |
| Paint specs | Brand, product line, sheen, and coat count |
| Cleanup | Daily cleanup, debris disposal, floor and fixture protection |
| Timeline | Start window, daily hours, estimated duration |
| Payment schedule | Milestone-based |
| Warranty | Written workmanship coverage with exclusions |
| Exclusions | Written list of what is not included |
| Credentials | Active general liability and workers’ compensation insurance, plus required licenses or registrations where applicable |
If any row is blank or answered with vague language, ask for clarification – or walk away.
FAQs
How many estimates should I compare?
Compare at least three written estimates from licensed and insured contractors.
Before you ask for bids, spend a little time researching and trimming your list to five to seven candidates. That gives you a solid group to compare without turning the process into a headache.
Looking at several quotes side by side makes it much easier to judge the scope of work, material quality, and prep details on equal terms. It also helps you spot unusually low bids that may leave out parts of the job or rely on lower-quality work and materials.
What should I ask if a bid is missing details?
Ask for a written, line-item scope that spells out exactly what’s included. That should cover the prep method, the paint brand and product line, and the number of coats in the bid.
You’ll also want them to define what “prep” means in writing. For example, does it include:
- Cleaning
- Sanding
- Caulking
- Priming
Then ask for written details on cleanup, warranty terms, project timeline, and how they calculated material coverage based on your square footage.
When is a low bid too low?
A low bid often isn’t a bargain. In many cases, it’s just a smaller scope dressed up as a lower price.
If one quote comes in far below the rest, there’s usually a reason. The contractor may be skipping prep work like sanding, priming, or caulking. They may also be using cheaper materials that won’t hold up as well.
That’s why it helps to ask exactly what prep work is included. Get clear on each step before anything starts.
If the estimate feels vague or the contractor won’t clearly spell out the scope, treat that as a major warning sign.