
A luxury paint job is not just pricier paint. It’s better prep, the right coating for each surface, and cleaner application. That’s why it can last 7–10 years indoors and 12–15 years outside, while lower-cost jobs may need repainting in 3–5 years.
If I had to sum it up fast, I’d say a luxury paint job means:
- More prep work: skim coating, sanding, crack repair, washing, scraping, caulking, and priming
- Better product matching: wall paint for walls, enamel for trim and cabinets, epoxy/polyaspartic systems for concrete floors
- Cleaner finish work: smooth walls, sharp cut-ins, even sheen, and fewer marks under light
- Lower odor options: low-VOC or zero-VOC coatings for bedrooms, nurseries, offices, and medical spaces
- Longer wear: fewer chips, less peeling, better washability, and less upkeep over time
In short: standard paint jobs focus on lower price and less labor. Luxury paint jobs focus on surface condition, finish quality, and service life. If you want walls and trim to look smooth in daylight, not just from across the room, that difference matters.
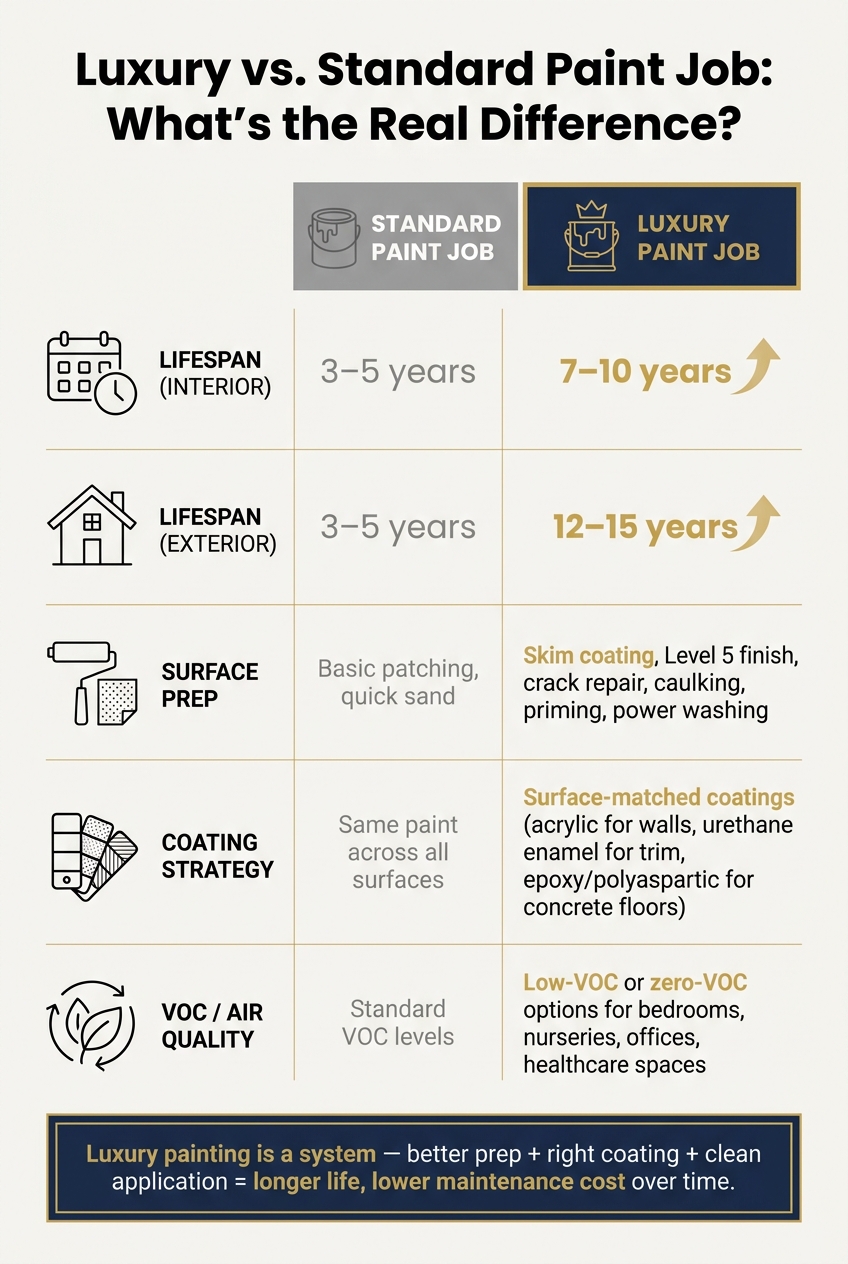
Luxury vs. Standard Paint Job: Cost, Lifespan & Quality Compared
Better materials produce deeper color and longer wear
Luxury painting means using the right coating for each surface, not putting the same paint on every room and calling it done. That matters because walls, trim, cabinets, and concrete floors all deal with different kinds of wear.
Premium paint lines and low-VOC coatings
Benjamin Moore Aura uses a zero-VOC colorant system that helps colors stay richer, creating deeper color with better fade resistance. Sherwin-Williams Emerald uses resins that resist burnishing, streaks, and stains, which makes it a strong fit for high-traffic walls and busy households.
Both lines also offer low-VOC and zero-VOC formulas. That means less odor and better air quality in places like nurseries, bedrooms, and healthcare offices, without giving up washability.
Why different surfaces need different coating systems
Different surfaces get hit in different ways, so luxury painting uses a coating system that fits the job. For walls, a premium acrylic topcoat paired with the right primer helps color look even and cuts down on flashing.
Trim, doors, and baseboards deal with constant hands, bumps, and scuffs. They need a harder finish than wall paint can give. Waterborne alkyd and urethane enamels such as Sherwin-Williams Emerald Urethane Trim Enamel or Benjamin Moore Advance level out into a smooth, furniture-like finish that resists chipping, cleans up well, and helps stop white trim from turning yellow over time.
In kitchens and baths, that same kind of enamel works well on cabinets too. Why? Because cabinets get wiped down all the time, and they need a finish that can take daily use without wearing out fast.
Garage and basement floors are a whole different story. They need a system built for concrete, not standard paint. A multi-coat epoxy basecoat with a polyaspartic topcoat bonds tightly to concrete and resists hot tire pickup, oil, road salt, and abrasion. Polyaspartic topcoats are UV-stable, so they are less likely to yellow or chalk in sunlight, and under normal residential use these systems commonly last 10–20+ years.
Matching the coating to the surface is only half the job; the surface still has to be prepared correctly.
sbb-itb-a2baf13
Surface preparation is where quality work begins
Even premium paint can't hide weak prep. If drywall is uneven, cracks are left open, or siding is chalky, those flaws still show up. And they tend to show up the most in spaces with big windows and recessed lighting, where light exposes joints, texture shifts, and patch edges people often miss until the paint is on the wall. That's why prep sits at the center of luxury painting.
Skim coating, Level 5 finishes, and fine sanding
In a standard paint job, prep often stops at patching a few holes and giving the wall a quick sand. Luxury work asks for more. The surface needs to look flat and even before the finish coat goes on.
A Level 5 drywall finish, as defined by the Gypsum Association, treats all joints, fasteners, and accessories, then covers the full surface with a thin skim coat. It's often called for when walls will be painted in higher-sheen finishes like satin or semi-gloss, in dark colors, or in rooms where light hits the wall from the side. Think great rooms with floor-to-ceiling windows, long hallways with recessed cans, or feature walls behind sofas. Without that extra work, small joint lines and texture changes can flash through the finish. The aim is simple: a wall that looks smooth in daylight and under fixtures.
Sanding also happens in steps. Start coarse enough to knock down ridges, then move to finer grits to smooth the surface before primer. Between coats, a light sanding helps remove dust nibs so the last coat can lie flat. Many crews also pull an LED work light across the wall at a low angle to spot flaws before moving on. That kind of close check is common in high-end work and rare in standard jobs.
Exterior cleaning, repairs, and priming
On exteriors, prep follows a set sequence because skipping one part cuts the life of everything that follows. It begins with power washing to remove dirt, chalking, and mildew. If old paint leaves behind a chalky residue, that has to come off because it gets in the way of adhesion. Areas with mold or mildew are treated with a fungicidal wash before rinsing.
Once the surface is dry, loose paint gets scraped back to sound material. Then the edges are feathered with 80–100 grit sandpaper so you don't see a hard ridge where old paint meets bare substrate. Gaps at trim joints, window casings, and siding seams are caulked with exterior-grade paintable caulk to help block moisture and clean up the lines. Bare wood, repaired spots, and metal surfaces are spot-primed with the right primer, whether that's stain-blocking, rust-inhibitive, or bonding. That way, the coating sticks cleanly and the finish stays even.
Protection and detail work before painting starts
Before any indoor sanding or painting starts, the protection plan comes first. Floors, furniture, fixtures, and trim are fully covered or removed before sanding begins.
Small flaws get treated with care too. Nail pops and hairline cracks need more than a fast skim coat. Popped fasteners are reset, then covered with joint compound and sanded smooth. Hairline cracks are opened slightly and filled with flexible compound or caulk. Along trim, where casings meet walls, painters run a clean, even bead of caulk so the joint disappears once painted.
Once the surface is this flat and clean, application technique is what shapes the final look.
Application technique determines how refined the finish looks
Once prep is done, the final result comes down to how the paint is put on. Even a top-shelf product can look average if the work is rushed, the brush or roller is loaded unevenly, overlap is sloppy, or edges are handled poorly. The details homeowners see every day - clean lines, smooth walls, and even sheen - depend on technique.
Sharp cut-ins, even coverage, and consistent sheen
A clean edge at the ceiling line or along a door casing is one of the clearest signs of skilled work. Painters usually use a 2–3-inch angled sash brush, then roll right after to avoid picture framing.
Sheen matters just as much as color. If the film thickness changes from one area to another, some spots reflect more light than others. That stands out fast under recessed lights or near windows. To keep the finish even, painters hold a wet edge, use a W or M roller pattern, and stop themselves from going back over sections that have already started to dry. They also box paint into one bucket so slight batch changes don’t leave faint bands.
Sprayed cabinet and trim finishes
That same level of care matters even more on trim and cabinets, where every flaw tends to stand out. For cabinets, doors, and detailed trim, spray application is often the go-to choice because it creates a smooth, low-texture finish. In many cases, crews spray doors and drawer fronts, then brush or roll frames and boxes.
Primer, sanding between coats, and giving the finish time to cure all help keep sprayed surfaces smooth and durable. Skip those steps, and the flaws show through.
Specialty finishes that improve the space
Specialty finishes - high-gloss trim, matte wall systems, and decorative coatings - need tight control. Mixing has to stay exact, film thickness has to stay even, and the area needs to stay free of dust.
Why the extra cost pays off over time
Appearance, durability, and maintenance benefits
Luxury painting costs more up front for a simple reason: the job includes better materials, more hands-on labor, and tighter quality checks. When the prep work is done well and the coating is matched to the surface, you usually spend less time and money dealing with wear later. Over time, the total cost can be lower.
Premium exterior systems can last 12–15 years, while a budget paint job on the same home may last only 3–5 years. In plain terms, that can remove one full repaint cycle within 10 years. On the inside, premium coatings paired with proper prep can last 7–10 years between repaints. Cabinets are less likely to chip, and specialty floors tend to handle spills and foot traffic better.
What to ask for in a luxury painting project
That payoff depends on having a clear scope before the first drop cloth goes down. Ask your contractor for a written prep plan for each surface, and make sure these points are covered:
- Materials: The exact paint lines being used, why they were chosen, and whether low-VOC options are offered for bedrooms, nurseries, or air-sensitive spaces
- Prep: Which primer goes on each surface, how drywall flaws will be handled indoors, and how exterior areas will be washed, caulked, and primed
- Application: How cabinets will be sprayed and cured, plus the multi-coat system planned for cabinetry
- Credentials: Proof that the contractor is licensed, insured, and EPA Lead-Safe Certified for pre-1978 homes
Conclusion: Luxury painting is a system, not just better paint
Luxury painting works best when the coating, prep, and application all fit the surface. Get those three parts right, and you end up with walls that look sharper, exteriors that last longer, and finishes that stay cleaner with less work.
26 Painting, LLC offers free estimates and tailored product recommendations for homes and businesses across New Jersey, including eco-friendly, low-VOC coating options and EPA Lead-Safe Certified service. Contact us to get a clear scope before your next project starts.
FAQs
Is a luxury paint job worth the higher cost?
Yes. A luxury paint job can be worth the money. Premium materials, careful surface prep, and skilled application usually lead to better durability, smoother coverage, and a finish that lasts longer.
Over time, that can mean less maintenance, fewer repaints, and better protection against problems like moisture and mold. It can also add beauty and value to your home.
How do I know if my walls need skim coating?
Consider skim coating when your walls have heavy texture, lots of patches, or surfaces that look uneven from one spot to the next.
It gives you a smooth, even base before paint goes on. That matters most on large walls with blotchy old paint, visible drips, messy cut-in lines, or repeat issues like cracks and peeling.
What should I ask for in a luxury paint estimate?
Ask for a detailed breakdown that covers surface preparation, materials, and application methods.
That breakdown should spell out:
- surface prep, including skim coating, fine sanding, patching, and repair work
- precision cut-ins and how edges, corners, trim lines, and transitions will be handled
- cleaning steps before paint goes on
- priming, including where primer is needed and what type will be used
- the exact paint products in the estimate, including whether it uses designer paint lines or low-VOC premium coatings
- how those materials affect durability, coverage, and lasting value
You also want the estimate to show what is included versus what would cost extra, so there are no surprises later.