
If your walls have small dents, patch marks, or old texture showing through, skim coating can help paint look smoother. I’d sum it up like this: inspect the wall under raking light, fix any moisture or damage first, apply two thin coats of joint compound, sand lightly, and prime before paint. Most coats dry in about 18 to 24 hours, and pro work often runs about $300 to $1,200 per room.
Before I paint, I’d keep these points in mind:
- Skim coat for surface flaws, not deep damage
- Repair leaks, mold, loose paint, and moving cracks first
- Use thin coats to help cut ridges and cracking
- Sand lightly with 180- to 220-grit before primer
- Prime the whole wall to help cut patchy sheen
- Call a pro for ceilings, stairwells, large rooms, or damaged plaster
A simple wall check can save time. If flaws are spread across most of the wall, a full skim coat often makes more sense than patching each spot one by one. If the wall has only a few marks, spot repairs may be enough.
| Situation | Best move |
|---|---|
| Small dents, nail holes, light texture mismatch | Skim coat |
| Deep holes, crumbling plaster, loose paint | Repair first |
| Water stains, mold, damp walls | Fix source and dry wall first |
| Pre-1978 painted surface | Use lead-safe prep |
| Large room, ceiling, stairwell | Think about hiring a pro |
Bottom line: skim coating is a prep step that can make a painted wall look smoother, but it only works well when the wall is dry, sound, and primed the right way.
SKIM COATING TIPS YOU NEED TO KNOW!
sbb-itb-a2baf13
When Skim Coating Is Needed and How to Check Your Walls First
Start by checking the wall before you open the compound. Hold a flashlight or work light at a shallow angle across the surface. That raking light makes ridges, dips, and old patched spots stand out fast. Mark each problem area with painter’s tape, then run a flat hand over the wall to feel high and low spots. That quick check helps you decide if the wall needs a full skim coat or only a few small repairs.
If minor flaws show up across most of the wall, skim coat the whole surface instead of fixing each spot one by one. But if the wall is mostly smooth and only has a few problem areas, fill and sand those spots without skim coating everything.
Wall Problems Skim Coating Fixes Best
Use skim coating when the wall itself is sound, but the face of it looks rough in a lot of places. Good candidates include light dents, scattered nail and screw holes, hairline cracks that have already been stabilized, and patchy repair areas where several old fixes leave the wall looking uneven under paint. It also helps with mismatched texture, including orange peel left behind from older repairs.
This shows up the most under eggshell, satin, and semi-gloss paint. Those finishes bounce light around, so even small surface changes become easy to see. A thin, continuous skim coat smooths those flaws into one even plane.
Problems to Repair Before Applying Any Skim Coat
A skim coat is a finish layer. It is not a fix for a wall that’s failing. Water stains, active moisture, mold, loose or flaking paint, deep holes, crumbling plaster, and moving cracks all need repair first. If you spread compound over those problems, it usually won’t stay hidden for long. It can crack, peel, or hold moisture under the surface, which makes the issue worse.
Wallpaper removal needs extra care. After old wallpaper comes off, leftover adhesive can cause bubbling and weak bonding if you skim coat right over it. Clean the wall, let it dry, and prime it before skim coating.
If the home was built before 1978, sanding or scraping may create lead dust. Paid prep and skim-coat work should follow EPA lead-safe practices. Hire an EPA Lead-Safe Certified contractor such as 26 Painting, LLC.
| Wall Condition | What to Do |
|---|---|
| Light dents, nail holes, texture mismatch | Skim coat after basic prep |
| Water stains or moisture | Fix the source first |
| Mold or mildew | Remove and dry completely before any coating |
| Loose paint | Scrape, feather, prime |
| Deep holes or crumbling plaster | Patch or repair substrate first |
| Moving or structural cracks | Stabilize before applying any finish layer |
| Pre-1978 painted surfaces | Use lead-safe work practices during all prep |
Once you’ve marked the trouble spots and ruled out deeper repairs, it’s time to gather your tools and get the room ready.
Tools, Materials, and Room Setup
Once the wall is ready for finishing, get your tools together first. This part matters more than people think. The tools and materials you use have a direct effect on how smooth the wall looks at the end.
Core Tools and Materials You Will Need
Start with the basics that help you flatten the surface and keep sanding under control. Use pre-mixed all-purpose joint compound, or mud. A 1-gallon pail works well for small repairs, while a 4.5- to 5-gallon bucket makes more sense for full walls. Pre-mixed compound is easier to spread and gives you more time to work than hot mud, which sets fast and is harder to sand.
For applying the mud, keep two taping knives on hand:
- A 6-inch knife for loading compound, filling small spots, and scraping down ridges
- A 10- to 12-inch knife for spreading thin coats and feathering edges across larger areas
A mud pan or hawk keeps the compound close so you’re not constantly reaching back to the bucket. For sanding, use a pole sander on big sections and sanding sponges where you need more control, like corners and edges. Pick up 120-grit abrasives for knocking down ridges between coats, then switch to 150- to 220-grit for the final smoothing before primer.
You’ll also want PVA drywall primer, painter’s tape, drop cloths, plastic sheeting, and safety glasses. Wear a dust mask or respirator too. Sanding joint compound creates fine dust, and that stuff gets into your eyes and lungs fast.
Protecting the Work Area and Managing Drying Conditions
Cover the floor with canvas or plastic drop cloths. Tape plastic sheeting over trim, baseboards, and HVAC vents so compound splatter and sanding dust stay put. If you can, move furniture out of the room. If not, cover it all the way with plastic. It takes a little extra time, but sealing doorways with plastic sheeting is often worth it, especially in an occupied home where drywall dust seems to get everywhere.
The point is simple: keep dust under control and give the skim coat a good place to dry so it comes out smooth and ready for primer.
Under normal indoor conditions, joint compound usually dries in 18 to 24 hours between coats. Humidity can slow that down a lot, so run a fan to keep air moving. Just don’t point direct airflow at wet compound.
With the room protected and the wall dry, start the first thin coat.
How to Skim Coat Walls Step by Step
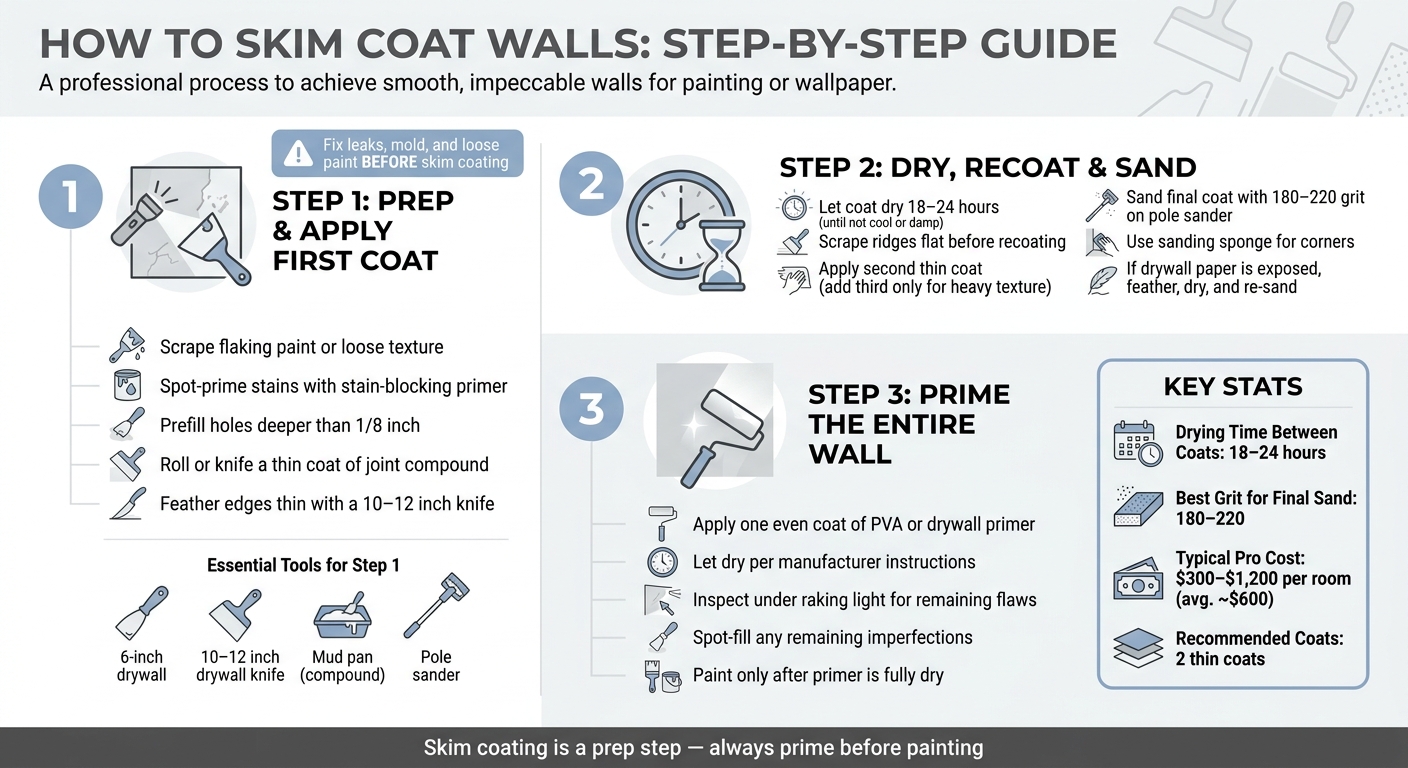
How to Skim Coat Walls: Step-by-Step Process Guide
Skim coating comes down to three moves: apply, dry and sand, then prime.
Step 1: Prep, Mix, and Apply the First Thin Coat
Once the wall is clean and repaired, start with a thin first coat. Give the surface one last wipe before you begin. If the wall has active damage, stop there and fix that first.
Scrape off any flaking paint or loose texture with a 4- to 6-inch knife. Then spot-prime stains with a stain-blocking primer so they don’t bleed through later. If you see holes or gouges deeper than 1/8 inch, prefill them before skim coating.
Mix the compound until it feels smooth and easy to spread. For large walls, roll a thin film of joint compound onto one section with a 1/2- to 3/4-inch nap roller, then smooth it with a wide knife or trowel using overlapping passes. For smaller areas or patches, load your 10- to 12-inch knife and use long, steady strokes, keeping the outer edge feathered thin.
The goal is simple: put on a thin coat, just enough to hide texture and small flaws.
Step 2: Dry, Recoat, and Sand for a Smoother Surface
Thin coats matter here. Thick coats tend to shrink and crack. In most cases, two thin coats do the job. Add a third only if you’re dealing with heavier texture or a wall that’s in plain sight.
Let each coat dry all the way before you add another one. Under normal indoor conditions, that usually takes about 18 to 24 hours. The surface should feel dry, not cool or damp.
Once a coat is dry, scrape off ridges with a knife held nearly flat before putting on the next one. After the final coat dries, sand lightly with 180- to 220-grit paper on a pole sander for large areas. Use a sanding sponge for corners. Keep the sander moving so you don’t dig low spots into the wall.
If sanding exposes the drywall paper or plaster underneath, stop and fix that area before going on:
- Feather a thin coat of joint compound over the spot
- Let it dry
- Sand it again
After the final coat is dry and smooth, prime before painting.
Step 3: Prime Before Painting for Even Sheen and Adhesion
Prime the skim coat so the paint bonds evenly and the finish looks even across the wall. Without primer, you can end up with flashing, or uneven sheen within the same color.
Apply one even coat of PVA or drywall primer. Let it dry based on the manufacturer’s instructions, then inspect the wall under raking light. This is the moment when leftover flaws tend to jump out, and that’s helpful. You can spot-fill those areas and touch them up before the finish coats go on.
Two thin coats usually produce the smoothest result.
Common Problems, DIY Limits, and When to Hire 26 Painting, LLC
Common Skim-Coating Problems and How to Fix Them
Most skim-coating problems come down to technique. The good news? A lot of them can be fixed without starting over.
Knife-edge ridges usually happen when the blade is held at too steep an angle or the passes aren’t feathered out. Sand the ridges with a pole sander and 120–220 grit paper. Then apply a thin re-skim, keeping the knife flatter to the wall.
Pinholes tend to show up when the compound is too thick, too dry, or spread over a dusty surface. That traps tiny air pockets. Mix the joint compound until it has a smooth, mayonnaise-like feel, then apply a tight finish coat with long, steady strokes.
Cracking often means the coat went on too thick, the next coat was added too soon, or the surface dried too fast. Sand any loose or lifted edges first. After that, build the area back up with thin coats and let each one dry all the way before adding the next.
Uneven texture comes from uneven pressure or inconsistent coat thickness. A bright work light helps a lot here. It makes high and low spots stand out fast. Sand the high areas, then skim the low spots with a thin blending coat.
Flashing after paint is that patchy sheen you notice once the wall is painted. It usually comes from skipped primer or skim coat that wasn’t fully dry. If the wall is already painted, spot-prime and repaint. During prep, prime the full skim-coated surface to help the finish look even.
If the same flaws keep coming back after two thin coats, you’re probably past the point of a simple DIY fix.
When to Hire a Professional for Skim Coating
Some jobs get hard in a hurry. Large rooms, open floor plans, ceilings, stairwells, and damaged plaster all add a layer of difficulty.
Ceilings mean overhead work from ladders, which is tiring and makes it harder to keep the coat even. Stairwells bring safety issues that many homeowners just aren’t set up to deal with. Older plaster walls also need a different touch than modern drywall. Use the wrong method, and the base can crack or delaminate.
Time matters too. A pro may finish in a day what takes a homeowner several weekends, especially when the work stretches across more than one room.
Professional skim coating usually costs $300 to $1,200 per room, and many jobs come in around $600. 26 Painting, LLC handles the whole process: wall assessment, surface prep, skim coating, sanding with proper dust control, and priming. They also offer a free estimate with pricing based on room size, condition, and job difficulty.
| Aspect | DIY Skim Coating | Professional by 26 Painting, LLC |
|---|---|---|
| Finish Quality | Variable; full rooms may show ridges or flashing under light | Smooth, even finish in high-visibility areas |
| Time Investment | Multiple weekends, including drying and rework | Finished efficiently with coordinated crews |
| Dust Control | Basic plastic and drop cloth protection | Structured containment that reduces dust spread |
| Safety | Higher risk on ladders, ceilings, and stairwells | Trained staff and proper equipment |
| Project Size | Best for small rooms or localized repairs | Good fit for large rooms, ceilings, and complex surfaces |
Conclusion: Key Steps for Better Paint Results
Skim coating goes better when you check the wall first, use thin coats, sand lightly, and prime before painting. For big, damaged, or hard-to-reach surfaces, 26 Painting, LLC can take care of both the prep work and the final finish.
FAQs
How smooth will skim coating make my walls?
Skim coating creates a smooth, paint-ready surface by covering major damage, uneven texture, dents, and other flaws. It works by applying thin, even layers of joint compound and sanding between coats to help the wall look more polished and even.
The final level of smoothness comes down to careful prep, steady application, and proper sanding. For large areas, badly damaged walls, or tricky surfaces, a professional can help deliver a better-looking result.
Can I skim coat over painted walls?
Yes. You can skim coat over painted walls to get a smooth, paint-ready surface. It works well when the wall has heavy texture, lots of patches, or uneven spots.
Start by cleaning the wall. Then apply thin coats of joint compound with a drywall knife. Let each coat dry all the way, and sand lightly between coats. Once the last coat is dry and smooth, apply primer before painting.
How do I know if I need repairs before skim coating?
Inspect the wall first. Professional help may be needed if the drywall feels soft, spongy, or warped, or if you see mold, deep cracks, or water stains that keep coming back.
For small dents, nail holes, or texture problems, you can usually handle the repair yourself. Wipe away dirt and grease, scrape off any loose or peeling paint, and sand the area so the compound can grip the surface.