
I’d choose Benjamin Moore Advance for a smoother brushed finish and Sherwin-Williams Emerald Urethane for less waiting between coats: about 16 hours versus 4 hours. Both can be brushed, rolled, or sprayed – but <u>recoat time is not full cure</u>.
My choice would come down to finish, schedule, cabinet material, and total cost – not just the price per gallon.
Quick Comparison
| Factor | Benjamin Moore Advance | Sherwin-Williams Emerald Urethane |
|---|---|---|
| Main advantage | More time for brush marks to level | Shorter wait between coats |
| Paint type | Waterborne alkyd | Water-based urethane enamel |
| Sheens | Satin, Semi-Gloss, High Gloss | Satin, Semi-Gloss, Gloss |
| Recoat time* | About 16 hours | About 4 hours |
| Coverage per coat | 400–500 sq. ft./gal. | About 350–400 sq. ft./gal. |
| Listed gallon price | $88.99 | $130.49–$132.49 |
Recoat times assume 77°F and 50% relative humidity. Prices shown are November 2026 listings; check current local pricing.
Before using either paint, I’d degrease, scuff-sand, and select a primer for the surface – wood, MDF, laminate, or an existing coating. I’d also budget for supplies, labor, and several days of careful handling. Faster recoating can shorten painting time, but it does not make cabinets ready for heavy use.
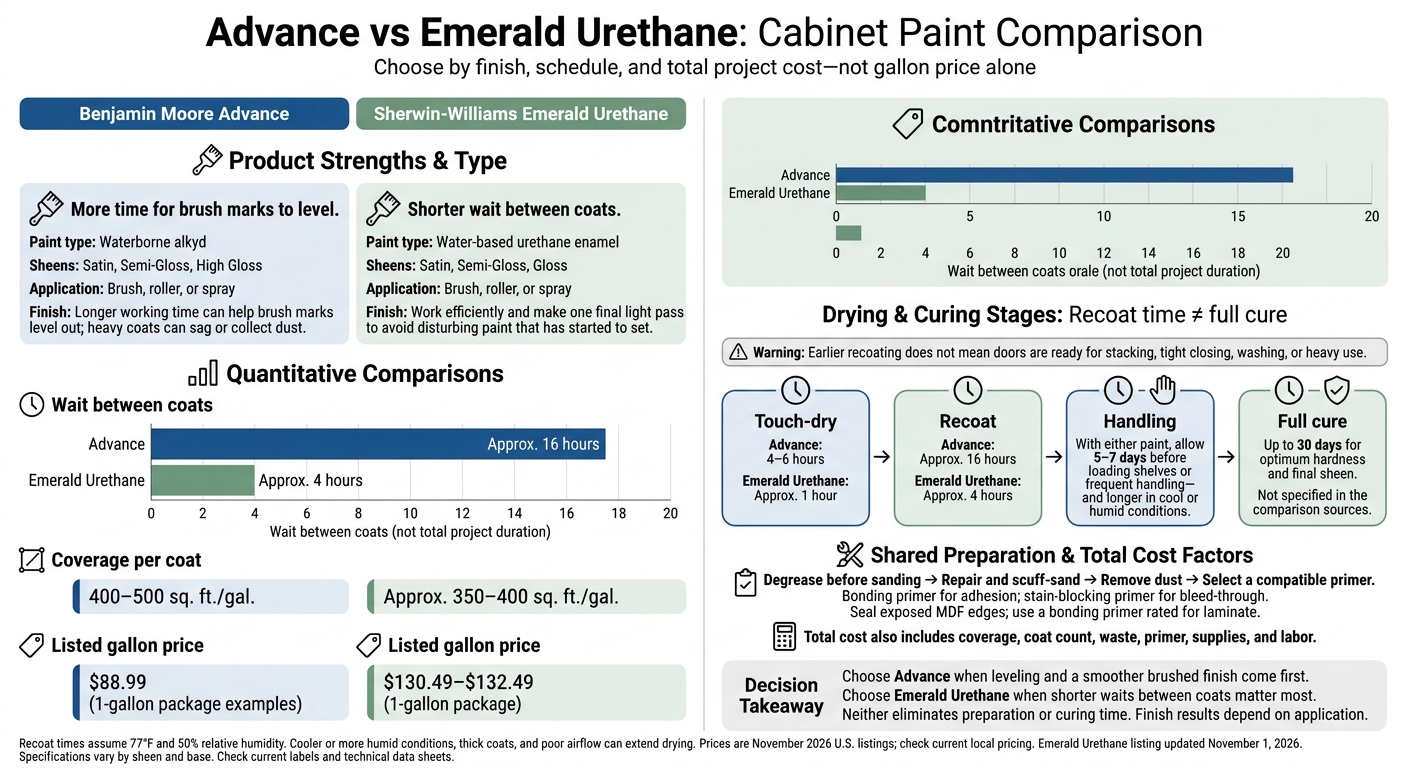
Advance vs Emerald Urethane: Cabinet Paint Comparison
Emerald vs. Advance: Sherwin-Williams vs Benjamin Moore Showdown!
sbb-itb-a2baf13
Advance vs Emerald Urethane: Performance Comparison
Use these specs as a starting point. Exact results vary by sheen and base.
| Specification | Benjamin Moore Advance | Sherwin-Williams Emerald Urethane |
|---|---|---|
| Chemistry and intended use | Waterborne alkyd for interior doors, trim, and cabinets | Water-based urethane enamel for trim, doors, and cabinets |
| Finish and sheens | Smooth, furniture-style finish; Satin, Semi-Gloss, High Gloss | Trim enamel; Satin, Semi-Gloss, Gloss |
| Application | Brush, roller, or spray | Brush, roller, or spray |
| Published coverage per coat | 400–500 sq. ft./gal. | Approximately 350–400 sq. ft./gal. |
| Recoat time at 77°F and 50% relative humidity | Approximately 16 hours | Approximately 4 hours |
Before buying, check the current U.S. technical data sheet for your exact sheen and base.
How you apply the paint affects leveling, brush marks, and the smoothness of your cabinet finish.
Finish Quality: Brush, Roller, and Spray
The results below are tendencies, not promises. Use a quality synthetic brush, fine-finish microfiber roller, or approved foam roller. Apply thin coats, keep a wet edge, and stop working the paint once it starts to tack. When spraying, follow the product’s current data sheet for straining, tip size, pressure, and thinning.
| Method | Advance: practical observations | Emerald Urethane: practical observations |
|---|---|---|
| Brush | Longer working time can help brush marks level out; heavy coats can sag or collect dust | Work efficiently and make one final light pass to avoid disturbing paint that has started to set |
| Roller | Can level well, though even a fine-finish roller can leave slight texture | Fine-finish rollers can still leave texture; avoid repeated passes |
| Spray | Can produce a smooth finish when properly strained and sprayed at the specified settings | Can produce a smooth finish when properly strained and sprayed at the specified settings |
Drying, Curing, and Cabinet Use
Emerald Urethane lets you recoat sooner, while Advance generally needs an overnight wait. With either paint, allow 5–7 days before loading shelves or frequent handling – and longer in cool or humid conditions. Thick coats and poor airflow also slow drying.
| Stage | Advance | Emerald Urethane |
|---|---|---|
| Touch-dry | 4–6 hours at 77°F and 50% relative humidity | Approximately 1 hour |
| Recoat | Approximately 16 hours under stated conditions | Approximately 4 hours |
| Careful handling | Allow several days before frequent handling or reassembly | Allow several days before frequent handling or reassembly |
| Full cure | Up to 30 days for optimum hardness and final sheen | Not specified in the comparison sources |
Drying and curing times depend on application conditions.
Durability, Cleaning, and Limitations
Prep, film build, and cure matter more to durability than the brand name.
| Benjamin Moore Advance | Sherwin-Williams Emerald Urethane |
|---|---|
| Leveling: Longer working time can help the paint flow, but heavy coats can sag or collect dust. | Scheduling: Faster recoating can shorten the project, but it doesn’t remove the need for drying and curing. |
| Handling and blocking: Protect the curing paint film from pressure, sticking, and imprints. | Handling and blocking: Earlier recoating doesn’t mean you can stack or close doors immediately. |
Once either finish has cured enough for cleaning, use mild soap, water, and a soft cloth, then dry promptly. Avoid abrasive pads, strong solvents, and harsh degreasers.
Ventilate during application and drying. Follow the label’s temperature and humidity limits, and use the specified protective equipment. Water cleanup alone doesn’t mean low odor or low emissions.
Getting that finish starts with cleaning, sanding, and priming the cabinets correctly. Prep and primer choice matter just as much as the paint.
Cabinet Preparation and Painting Steps
Once you choose a finish, prep and primer determine how well it bonds, levels, and lasts. Remove and label doors, drawers, shelves, and hardware. Bag screws and hinges by location, then protect countertops, floors, appliances, and openings with plastic and tape.
Clean before sanding. Remove grease, wax, polish, and silicone, then wipe dry. Fill dents and damaged edges, let the repairs dry, and sand them smooth. Scuff-sand sound coatings or degloss as needed. Vacuum and wipe away dust before applying any coating.
After cleaning and sanding, choose a primer suited to the cabinet material.
Primer for Wood, MDF, Laminate, and Painted Cabinets
Use bonding primer for adhesion and stain-blocking primer for bleed-through. Apply a compatible wood primer to bare wood, seal exposed MDF edges, and prime filler repairs. Tannins, knots, and water marks need stain-blocking primer. For laminate, clean the surface, lightly abrade it, and use a bonding primer rated for laminate. If raised fibers leave primed MDF edges rough, sand those edges again.
Advance calls for full priming on new surfaces but allows spot priming on some previously painted surfaces. Sound painted cabinets with compatible coatings may need only spot priming after cleaning and scuff-sanding. Check each product’s substrate limits.
For unknown coatings or laminate, test the full primer-and-topcoat system in a hidden spot. Allow the specified drying time, then check adhesion with firm tape removal and light scratching before moving ahead.
Your application method also affects prep, masking, and safety.
DIY Brushing and Rolling vs Professional Spraying
With either paint, brushing and rolling need less masking than spraying, but you’ll trade some finish smoothness for roller texture. Spraying requires more masking, overspray control, ventilation, and the respirator specified in the safety guidance – not a dust mask.
In pre-1978 New Jersey homes, test for lead before disturbing coatings and use lead-safe containment and dust control. Consider hiring an EPA lead-safe certified contractor.
Work in a conditioned space during New Jersey’s humid summers and cold winters. Advance specifies 50°F–90°F for both air and surface temperatures. Check Emerald Urethane’s current temperature limits on its label and technical data sheet.
Inspect each dried coat under low-angle side lighting. Look for missed edges, runs, and uneven texture, and fix defects only when sanding or recoating is permitted. Reinstall labeled hardware once the finish can withstand handling. Wait until full cure before tight closing, stacking, washing, or heavy use.
With prep covered, the next tradeoff is cost versus labor.
Paint Prices and Professional Repainting Costs
List price is just the starting point. Your final cost depends on coverage, waste, primer, supplies, and labor.
| Product and package | Listed U.S. price | Manufacturer coverage | Listing date context |
|---|---|---|---|
| Benjamin Moore Advance Satin, 1 gallon | $88.99 | 400–500 sq. ft./gal | Updated November 2026 |
| Benjamin Moore Advance High Gloss, 1 gallon | $88.99 | 400–500 sq. ft./gal | Updated November 2026 |
| Sherwin-Williams Emerald Urethane Trim Enamel, 1 gallon | $130.49–$132.49 | Approximately 350–400 sq. ft./gal | Updated November 1, 2026 |
Start by calculating how many gallons you need, then add primer and supplies. Sherwin-Williams lists about $41.50–$43.50 more per gallon than Advance. But your paint bill also depends on coat count, usable coverage, waste, and available container sizes.
Calculate Paint Quantity and Material Costs
Measure every surface you’ll paint: both sides of painted doors, drawer fronts, frames, end panels, toe-kicks, fillers, and interiors. Then use this formula:
Gallons required = (total paintable area × finish coats × (1 + waste allowance)) ÷ manufacturer coverage
Round up to the nearest available container size.
Use the low end of the coverage range for porous, textured, heavily sanded surfaces or when changing colors. Budget for primer, cleaners or degreasers, abrasives, tack cloths, caulk or filler, masking materials, drop cloths, gloves, and brushes or rollers. Include hardware replacement if planned, plus spray equipment costs if you’re spraying.
Example only: For 180 sq. ft., two finish coats, 450 sq. ft./gal coverage, and 15% waste, the calculation is 180 × 2 × 1.15 ÷ 450 = 0.92 gallon. Round up to one gallon. Using Advance’s lower listed coverage of 400 sq. ft./gal instead brings the requirement to 1.04 gallons, requiring another container.
What Professional Cabinet Repainting Includes
If you’re hiring a painter, price the full job – not just the paint. Professional cabinet repainting typically includes site protection, labeling, removal, repairs, sanding, priming, masking, finish application, cure time, quality control, and reinstallation.
Ask for a written scope that names the preparation steps, compatible primer, cabinet finish, application method, and coat count. Compare that quote with your full DIY budget, including tools, workspace, time, and possible rework.
Conclusion: Choose by Finish, Downtime, and Budget
Choose Benjamin Moore Advance when finish comes first and Sherwin-Williams Emerald Urethane when time is tight. Neither is the best choice for every kitchen.
| Your priority | Better fit | Main trade-off |
|---|---|---|
| Smoother brushed or rolled finish | Advance | Strong leveling, but about 16 hours between coats. |
| Faster spray production or tighter scheduling | Emerald Urethane | About 4 hours between coats; full cure still takes time. |
Material compatibility depends on the primer and existing coatings. Your choice also comes down to the finish you want, your application method, how much downtime you can allow, and your budget.
Those recoat times assume 77°F and 50% relative humidity. Cooler or more humid conditions mean longer waits. Recoat time isn’t the same as full cure, and Advance still needs several days before hard use.
FAQs
Which paint resists cabinet chips and scratches better?
Both Benjamin Moore Advance and Sherwin-Williams Emerald Urethane Trim Enamel create hard, furniture-like finishes that help cabinets resist chips and scratches. But protection against damage depends more on proper prep and curing than on the brand you choose.
Clean thoroughly, scuff sand, and apply a high-quality bonding primer. These steps help paint grip the surface, reducing the risk of chips, scratches, and peeling over time.
Which sheen hides cabinet imperfections best?
Flat or matte finishes hide cabinet flaws best. They reflect less light, so dents, bumps, sanding scratches, and patchy areas are harder to see.
Semi-gloss and high-gloss finishes are more durable and easier to clean. But they reflect more light, making flaws stand out unless the surface is very smooth.
Can I touch up either finish without visible marks?
Usually, yes – but a completely invisible touch-up can be hard to achieve. Brushed or rolled finishes may show differences in sheen or texture, while sprayed finishes tend to look smoother.
Use the exact same product and sheen, then lightly scuff-sand the area. Apply primer if you sand through the finish or patch the surface. Add thin, even coats, and avoid reworking areas that have started to dry. Allow up to a week for the finish to fully cure before heavy handling.