
I start with repairs – not paint. Before painting an older home, check for leaks, loose plaster, rotten wood, and failing coatings. If your home was built before 1978, arrange lead testing or lead-safe planning before scraping or sanding.
Here’s what I’d check first:
- Peeling or bubbling paint: Find the moisture source or coating problem before choosing prep methods and primer.
- Soft wood or cracked plaster: Repair damaged material; get help for sagging ceilings or cracks that keep returning.
- Stains or mold: Fix the water source and dry wet areas within 24–48 hours to help limit mold growth. That doesn’t mean they’re ready to paint.
- Poor adhesion: Clean the surface, use a compatible primer, and test a small patch before coating the whole area.
My rule: <u>fix the cause before covering the damage</u>. For recurring problems, ask 26 Painting, LLC for a repair and painting estimate, with separate lead, moisture, or structural checks when needed.
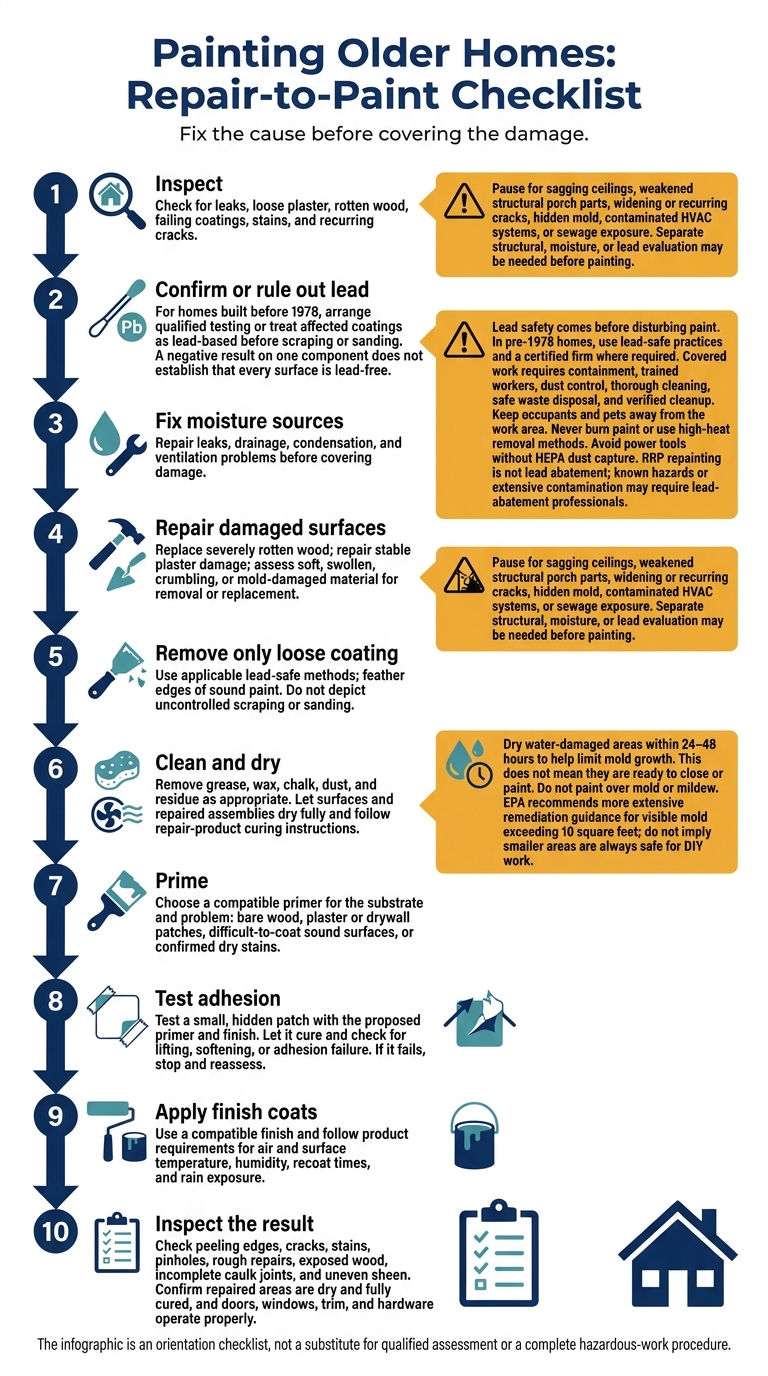
Painting Older Homes: Repair-to-Paint Checklist
Solving Common Paint Problems
sbb-itb-a2baf13
Check for Lead Before Disturbing Paint
For homes built before 1978, plan for lead safety before sanding or scraping. Disturbing lead-based paint releases dangerous dust and chips, with young children and pregnant people at the highest risk. Have a lead-safety plan ready before surface prep, and keep occupants and pets away from the work area.
Decide Whether Lead Testing Is Needed
Newer paint can cover older lead-based layers. If you don’t know the coating history, arrange qualified testing or treat the affected coatings as lead-based. A certified renovator can use an EPA-recognized test kit or lab analysis to help plan the work. A negative result on one component doesn’t mean every surface being disturbed is lead-free.
Surface testing helps guide the paint job and determine the controls needed. For a broader review, hire a certified lead inspector to locate lead paint or a risk assessor to evaluate hazards in paint, dust, and soil and recommend controls. Project-level testing doesn’t replace either service. If lead is found or presumed present, the work method must change.
Follow Lead-Safe Work Practices
Contracted work that disturbs paint in pre-1978 homes generally falls under EPA’s Renovation, Repair, and Painting (RRP) Rule. Before work begins, ask whether the firm is RRP-certified, whether a certified renovator will supervise, and whether the contractor will provide EPA’s lead-safety information pamphlet.
Covered work requires containment, trained workers, dust control, thorough cleaning, safe waste disposal, and verified cleanup. Ask how the crew will protect floors, furnishings, and HVAC openings. Unsafe removal can spread contamination and compromise surface prep. Never burn paint or use high-heat removal methods. Avoid power tools without HEPA dust capture.
RRP repainting is not lead abatement. If there’s extensive contamination or a known lead hazard, assessment and work by lead-abatement professionals may be needed before repairs and painting proceed.
Paint Failure and Wood Damage
Failed paint and damaged wood need different repairs. Loose paint may need surface prep, while soft or damp wood needs repair before painting. Start by matching the symptoms to a likely cause.
| Symptoms | Probable causes | Preparation or repairs | Primer or finish choices |
|---|---|---|---|
| Curling edges or loose chips | Moisture, dirt, unstable older layers | Fix moisture problems; safely remove loose paint; feather edges; let dry | Compatible primer on exposed areas, followed by exterior finish |
| Round bubbles | Damp wood, trapped moisture, direct sun | Find the moisture source; remove failed coating; let wood dry | Primer and finish suited to the substrate and exposure |
| Sheet peeling or chalking | Grease, wax, gloss, weathering, incompatible layers | Clean; safely degloss; remove unstable material; test adhesion | Bonding primer where appropriate; compatible trim or wall finish |
| Soft wood or open joints | Repeated water entry, exposed end grain, decay | Repair leaks and joints; replace severely deteriorated wood | Bare-wood primer and exterior paint, or a suitable stain system |
The table gives you a starting point. Confirm the cause before repainting.
Peeling, Flaking, and Blistering
Start with the visible damage, then look for moisture or coating breakdown. Loose chips, curling edges, and bubbles are symptoms – not a diagnosis. Check nearby spots where water could enter first. Blisters that appear soon after painting may also point to direct sun or a damp surface.
Fix the cause before covering the damage. A small, isolated patch may need only local prep. Failure that covers large areas or keeps returning calls for a closer check of moisture and older paint layers.
Address moisture first and let the surface dry. Then remove only unstable paint using the applicable lead-safe methods, feather the edges of sound paint, clean away residue, and prime exposed areas. Otherwise, your new finish sticks to a layer that’s already coming off.
Poor Adhesion on Trim, Cabinets, and Walls
Sheet peeling, wrinkling, and early failure can happen when you paint over grease, wax, gloss, dampness, incompatible coatings, or paint that hasn’t cured enough.
Wash greasy cabinets and trim with an appropriate cleaner. Rinse when required and let them dry fully. Remove wax, chalk, and dust from walls. Scuff-sand glossy surfaces using applicable lead-safe methods, then test a small patch with your proposed primer and finish. Let the patch cure and check adhesion before painting the whole surface.
Use a bonding primer on sound surfaces that are difficult to coat, along with a compatible trim finish, such as satin or semigloss.
Rotting Trim, Siding, and Porch Wood
Gently probe suspect wood with an awl or screwdriver. Soft, crumbly areas, open joints, and exposed end grain need moisture repairs – not another coat of paint.
Replace severely rotten boards, and have weakened structural porch parts assessed. Use repair fillers only for small, stable defects. Once the wood dries, prime bare areas and end grain before painting, or follow the instructions for a suitable stain system.
Skip pressure washing on fragile or lead-painted wood. It can gouge the surface, force water behind siding, and spread debris.
Plaster Cracks and Moisture Damage
Repair plaster and drywall problems before repainting. Once you’ve ruled out or repaired wood damage, check the wall surface for cracks and moisture.
Cracked Plaster, Loose Patches, and Nail Pops
Stable hairline cracks are usually cosmetic. But cracks that widen, return, bulge, or spread outward from windows or doors need closer attention. Photograph and measure them. Recurring movement calls for a plaster professional, building inspector, or structural engineer. Have ceiling sagging assessed before painting, too.
For stable damage, carefully remove loose material. Apply a compatible plaster patch in thin coats, following the product’s curing instructions. Broader cracks may need embedded mesh or suitable joint tape. Detached plaster needs reattachment or removal – not just filler.
For an isolated nail pop, secure the surrounding material before filling. Repeated pops or hollow-sounding patches call for assessment.
Smooth cured patches and remove dust, then apply a plaster or drywall primer to prevent flashing, or uneven sheen. Any preparation that disturbs pre-1978 coatings requires lead-safe procedures.
Water Stains, Mildew, and Soft Drywall
When cracks appear alongside stains or soft spots, trace the moisture source next.
Watch whether stains change after rain, plumbing use, or condensation. Check nearby roofing, flashing, pipes, gutters, and ventilation. Musty odors, swelling, or repeated peeling can point to hidden moisture.
EPA guidance recommends drying water-damaged areas within 24–48 hours to reduce mold risk. That time frame does not mean the wall cavity is ready to close or paint.
| Condition | What to do before painting |
|---|---|
| Dry stain; firm surface; no odor or recurrence | Confirm the source is fixed, clean and dry the surface, then apply stain-blocking primer. |
| Active leak, dampness, or recurring stain | Fix the leak, drainage, condensation, or ventilation problem. Dry the assembly before making repairs. |
| Small mildew area on a sound, cleanable surface | Fix the moisture problem, clean with detergent and water, and dry completely. Do not paint over growth. |
| Soft, swollen, crumbling, or mold-damaged material | Assess whether removal or replacement is needed. Inspect and dry the backing or cavity before closing it. |
Don’t dry sand or brush painted surfaces with mold or mildew; this can spread dust and debris. Get professional help for hidden growth, contaminated HVAC systems, or sewage exposure. EPA recommends more extensive remediation guidance for visible mold exceeding 10 square feet. Repair or replace weakened material before priming and painting.
Conclusion: Repair First, Then Paint
Follow the Repair-to-Paint Steps
Repair the underlying problems before painting, and make sure the surface passes a final check. Follow this order: inspect, confirm or rule out lead, fix moisture sources, repair damaged surfaces, remove only loose coating, clean and dry, prime, test adhesion, apply finish coats, and inspect the result.
In pre-1978 homes, any work that disturbs coated surfaces must follow lead-safe practices and be handled by a certified firm where required.
After priming, test a small, hidden area for lifting, softening, or adhesion failure. If it fails, stop and reassess the existing coating and primer.
For exterior work, follow the product requirements for air and surface temperature, humidity, recoat times, and rain exposure. Check the finished work for peeling edges, cracks, stains, pinholes, rough repairs, exposed wood, incomplete caulk joints, and uneven sheen. Confirm that repaired areas are dry and fully cured. Also check that doors, windows, trim, and hardware operate properly.
Request an Assessment From 26 Painting, LLC
Paint failure in older homes often starts with moisture, movement, or damaged materials. If damage keeps returning or affects multiple surfaces, get an assessment before repainting.
Request an assessment for recurring peeling, moisture damage, plaster movement, wood rot, or suspected lead paint. 26 Painting, LLC can define the prep, repair, primer, and repainting scope.
Ask for a free estimate that identifies products, scheduling, and exclusions. The estimate defines the painting scope only; a separate structural, moisture, or lead evaluation may still be needed.
FAQs
Can lead paint be safely painted over?
Yes, you can paint over lead paint if the surface is stable and properly contained. But a new coat won’t fix peeling or flaking paint – or the problems causing it. Sanding or scraping without precautions creates toxic dust.
If your home was built before 1978, test for lead before starting work. If lead is present, use lead-safe practices, including wet methods and HEPA-filtered equipment. For serious lead hazards, hire an EPA-certified professional to help keep the work safe and meet regulatory requirements.
How can I tell if repaired wood is dry enough to paint?
Check moisture with a moisture meter – touch and appearance can be misleading. Aim for a reading below 14%, ideally between 8% and 12%.
Do not paint if the moisture level exceeds 15% to 20%. Too much moisture can cause blistering, peeling, and poor paint adhesion.
How should I budget for unexpected repairs before painting?
For an older home, budget 30%–75% more for surface preparation and repairs than you would for a standard project. The added cost depends on issues such as peeling paint, wood rot, or mold. Start with a walkthrough, checking for soft wood, cracked caulk, and mildew.
Ask professionals for quotes that spell out the costs for repairs, scraping, sanding, and lead-safe compliance. Professional interior drywall repairs typically cost $300–$1,520, depending on the surface and the complexity of the work.