
For smooth walls, I start with repairs – not more paint. I level patches, sand them flush, remove dust, and prime where needed before applying even coats. On smooth drywall, a 3/8-inch roller nap often works well, but it still leaves a fine texture.
Here’s what I focus on:
- Fix the cause: Address leaks, loose paint, and recurring cracks before covering them.
- Control the finish: Keep a wet edge, use light roller pressure, and follow the paint’s drying instructions.
- Check the result: Look for flush repairs, clean edges, and even sheen in normal room light.
- Set clear expectations: Confirm repairs, primer, coat count, cleanup, and touch-ups in writing.
For homes built before 1978, I check lead-safe requirements before disturbing paint. My rule: <u>prep first, paint second</u> – and dry to the touch doesn’t mean ready for another coat.
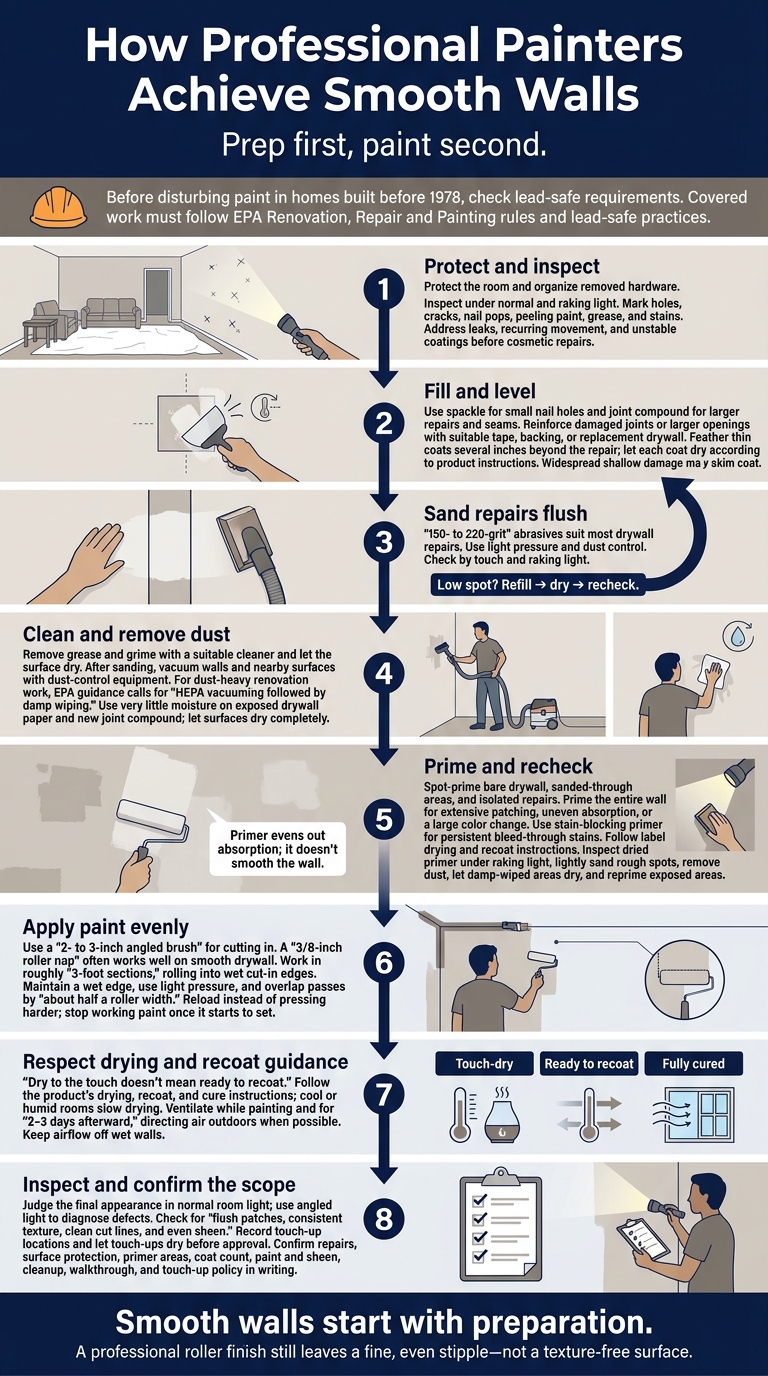
How Professional Painters Achieve Smooth Walls
Smoothing Walls
sbb-itb-a2baf13
Inspect and Repair the Walls
Before repairs begin, painters protect the room, remove hardware, and keep it organized for reinstallation. In homes built before 1978, they test for lead-based paint before disturbing coated surfaces. Covered work must follow EPA Renovation, Repair and Painting rules and lead-safe practices.
With the room protected, painters inspect the walls under normal and raking light.
Find Wall Defects and Their Causes
After safety checks, painters look for flaws that could show through the paint. **Raking light – a light held at a shallow angle – **makes raised seams, dents, and old patch edges easier to spot. They mark holes, cracks, nail pops, peeling paint, grease, and stains that need attention.
Loose coatings must come off down to a stable edge, with proper dust control. Leaks and recurring movement need correction before cosmetic repairs. Filler won’t fix an active leak or keep a crack from reopening.
Fill Holes and Level Uneven Areas
Small nail holes need spackle; larger repairs and seams need joint compound. Painters remove crumbly material, then reinforce damaged joints or larger openings with suitable tape, backing, or replacement drywall.
Using a joint knife, they press filler into the defect and feather thin coats several inches beyond the repair. Each coat must dry according to the product instructions before the next coat goes on. Shallow damage across large areas may need a skim coat rather than separate patches, adding drying and sanding time.
Sand Repairs Flush
Once repairs are fully dry, painters sand with light pressure using a sanding block, sponge, or dust-controlled sander. Most drywall repairs call for 150- to 220-grit abrasives. Sanding too aggressively can gouge the wall or expose the drywall paper.
Painters check the repairs by touch and under raking light. Low spots need another thin coat – not harder sanding – followed by drying and another check. Once the surface feels level, they remove the dust before priming.
Remove Dust and Prime the Walls
Clean Walls Before Priming
Before priming, remove grease and grime with a suitable all-purpose cleaner and a soft cloth. Let the surface dry completely. Skip steel wool, abrasive pads, and solvents that could damage the existing paint.
After sanding, vacuum walls, trim, floors, and nearby surfaces with dust-control equipment. Then wipe nonporous surfaces from top to bottom with a clean, slightly damp, lint-free cloth. Change cloths often. EPA guidance calls for HEPA vacuuming followed by damp wiping for dust-heavy renovation work. Leftover dust can weaken adhesion and show through the final coat.
Use very little moisture on exposed drywall paper and newly applied joint compound. Too much water can soften both. Let all surfaces dry completely before priming.
Decide Where to Apply Primer
Primer is the last prep step before finish paint. Spot-prime bare drywall, sanded-through areas, and isolated repairs with a compatible primer. Prime the entire wall when it has extensive patching, uneven absorption, or a large color change. For persistent water, smoke, or other stains that bleed through, use a stain-blocking formula.
Primer evens out absorption; it doesn’t smooth the wall. It helps prevent flashing – differences in sheen – but sanding removes surface roughness. Primer won’t flatten ridges or fill depressions.
Apply primer evenly without leaving heavy buildup around patch edges. Follow the label’s drying and recoat instructions instead of assuming a fixed wait time.
Once the primer dries, inspect the wall under raking light – light directed across the surface. Lightly sand rough spots, remove the dust, and let any damp-wiped areas dry. Touch up exposed areas with primer so the wall is sealed and ready for an even finish coat.
Paint Without Ridges or Roller Marks
Choose the Right Tools and Apply Paint Evenly
Once the wall is primed and dust-free, apply the finish coat evenly to keep the surface smooth.
Use a quality 2- to 3-inch angled brush to cut in along ceilings, corners, and trim. Choose a roller cover that suits the paint and wall texture. A 3/8-inch nap often works well on smooth drywall. Even a professional roller finish leaves a fine, even stipple – not a texture-free surface.
Load the roller evenly, and keep the brush only partly loaded. The paint should go on wet without dripping. Work in roughly 3-foot sections, rolling into the wet cut-in edges and keeping a wet edge as you go.
Apply light, even pressure and overlap each pass by about half a roller width. When the roller runs low, reload rather than press harder. Finish with light, parallel passes, and stop once the paint starts to set.
Follow Drying Times and Room Requirements
Cool or humid rooms make paint take longer to dry and become ready for another coat. Dry to the touch doesn’t mean ready to recoat, and full curing takes longer still. Between coats, check the coverage and sheen. Let minor flaws dry before correcting them, and wait to wash the wall until the product’s cure guidance allows it.
Ventilate while painting and for 2–3 days afterward, directing air outdoors when possible. Keep airflow off wet walls so the paint dries evenly and maintains a consistent sheen and texture.
Once the paint dries, check for ridges, roller marks, or changes in sheen.
Check the Finish and Know What to Expect
Check for Common Finish Problems
Once the paint dries, check the walls in normal room light. Then use angled light to spot ridges, scratches, flashing, bumps, and changes in texture. Look for flush patches, consistent texture, clean cut lines, and even sheen. Use the room’s normal lighting to judge the final appearance.
| Visible Problem | Likely Cause or Prevention Cue |
|---|---|
| Visible patches or flashing | Uneven repairs or differences in paint absorption |
| Surface ridges | Compound left above the surrounding surface |
| Roller marks | Maintain a wet edge and consistent pressure |
| Bumps | Dust or debris trapped in the finish |
| Peeling or recurring cracks | Check for moisture, movement, or adhesion problems. Remove unstable coating, address the cause where possible, and use the appropriate primer. |
During the walkthrough, record the exact spots that need touch-ups. Check that floors, fixtures, furniture, and nearby surfaces are clean. Let touch-ups dry and blend before approving the finish.
Use this walkthrough to confirm what was repaired, what was painted, and what still needs attention.
Confirm the Scope With 26 Painting, LLC
Compare the completed work with the agreed scope. Get written confirmation of the repairs, surface protection, primer areas, coat count, paint and sheen, cleanup, final walkthrough, and touch-up policy. Ask whether preparation is included, what’s excluded, and how added repairs will be approved and priced. Confirm payment terms, scheduling, and room access requirements, too.
26 Painting, LLC offers free estimates and on-site assessments for residential and commercial interiors. Wall condition and repair depth affect labor and timing. Deep patches may need several applications, each with its own drying period. Higher-sheen finishes show more defects, while major color changes may need extra coats. Ask for a schedule that leaves enough time for proper drying.
Confirm licensing, insurance, and Lead-Safe practices for pre-1978 homes or child-occupied facilities. If covered work will disturb painted surfaces in these buildings, verify certification and lead-safe procedures before work begins.
Conclusion: Smooth Walls Start With Preparation
Inspect, repair, level, sand, remove dust, prime, then paint, using controlled application and enough drying time. Flush patches, uniform texture, clean edges, and a clearly defined preparation scope are practical signs of professional-quality work. Request a free estimate from 26 Painting, LLC to find out what your walls need before painting starts.
FAQs
Do my walls need patching or a full skim coat?
If your walls are already flat, clean, and even, spot patching and sanding will likely be enough to fix small dents or nail holes.
A full skim coat is recommended when walls have broad waves, heavy texture, lots of patches, or visible seams. It can also help if you’re planning a high-gloss finish or if strong light shines across the wall, making small flaws easier to see.
Can painters smooth walls that are already textured?
Yes. For heavy texture or broad waviness, professional painters typically skim-coat the entire wall with lightweight joint compound. They use a 12- to 14-inch drywall knife to create a flat, even base. For smaller flaws or lighter textures, sanding may be enough.
Once the surface is level and dust-free, a high-quality primer seals it, helping the final coat of paint adhere evenly and keep a consistent sheen.
What should wall preparation include in my estimate?
Your estimate should spell out the surface prep work: cleaning off dust, grease, and residue with TSP or mild soap; filling holes, cracks, and dents with spackle or joint compound; and dealing with loose or flaking paint.
It should also include sanding to smooth imperfections and feather edges, then removing the dust and applying primer. Priming seals repairs and helps the surface absorb paint evenly for a consistent sheen.